HAZELNUT DROP COOKIES, Simple, Sleek, Elegant, and Awesome

Simple, sleek, hazelnutty perfection

Imagine the esthetic behind Danish Modern furniture: minimal, sleek, efficient, elegant, useful, classically beautiful, and easy to customize. Now take that esthetic and design a cookie to match. We’ve got you covered.
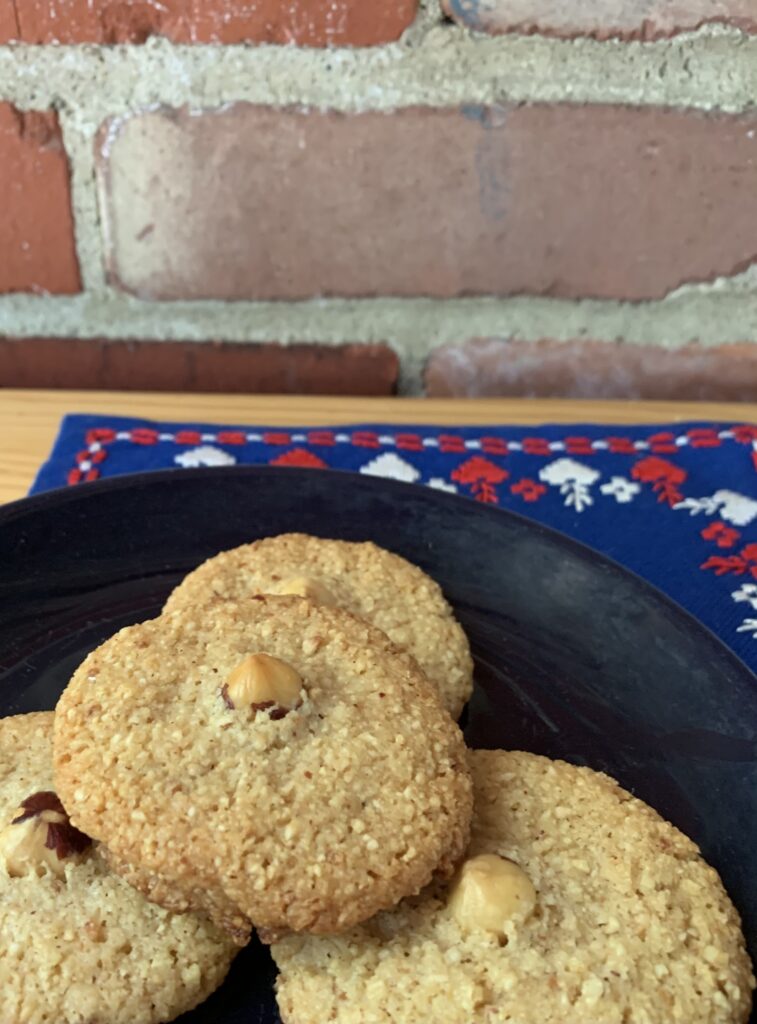
Minimalist: Six ingredients: nuts, butter, sugar, salt, an egg, and baking powder. No more, no less.

Sleek and Efficient: Beat it all together, divide into balls, and bake. There’s no flour to hydrate, and thus no actual need to chill in advance (though I will admit it makes the dough less sticky).

Elegant: How about we kick up the baking temperature to ensure a golden brown, extra-toasty bottom that enhances the basic nut flavor? Clever! And let’s add just enough baking powder to keep the cookie from ever feeling dense or pasty.

Useful: Unexpected guests? Need a moment of self-reward? I’ve yet to meet a cookie that freezes better, and they’re delicious right out of the chill chest.

Classically Beautiful: This is the girl next door of Cookieville, and you wouldn’t be reading this if you didn’t love the type.

Easy to Customize: Want your cookie textured and noshable? Done. Use ground nuts, and remember to bar your door against the likes of my wife. Want something firm but soft, like a shoulder to rest on? Grate the nuts to meal, and do not bar your door because I may be dropping by for a surprise inspection. Want to go all out, and make something that melts on the tongue like almost-liquid flavor? Pulse the grated meal all the way down to flour. Or play with a different nut. Or a mix of nuts. Or… You get the idea.

(A NOTE FROM KATE: I would like to point out that aside from being naturally gluten-free, this cookie is, with the exception of sugar, a “whole food.” Nuts are good for you, eggs are good for you… and why say no to just a bit of sugar? In fact, I predict that cookies such as these will become a new health food trend!)

NOTES ON PROCESS AND PROCEDURE

There isn’t much to say. This really is as simple as it sounds.

(NOTE FROM KATE: To be fair, I did find that the pre-roasted hazelnuts were just a bit too hard for the rotary grinder. Husband + food processor = easy solution.

Do I really need to roast the nuts…? For heaven’s sake, most stores sell them pre-roasted! But if you bought fresh, unroasted nuts, the answer is yes. Roasting develops the hazelnut flavor, which is what you’re after in the first place. Cookies made with raw nuts will work just fine, but the same can be said of furniture no one’s bothered to varnish.

“I’m so confused? Where do I get ground nuts? Or hazelnut meal? Or hazelnut flour? Who carries that?” [Sigh] Start with whole nuts. Then:

  • For ground, put them in a food processor and pulse until you arrive at rough, finely pebbled, ground-nut sand; i.e., the stage right before they start to turn into nut butter. Remember to scrape the sides of the food processor bowl as you go in order to (a) release any fine particles, and (b) check see if you are getting too close to the nut-butter stage.
  • For nut meal, pull out a rotary grater with a middle-fine wheel. Put the nuts in and proceed until you have a light and fluffy meal. Food process coarsely if you need to break down the whole nuts first.
  • For nut flour, pulse the grated nut-meal a few times in the food processor.

Besides, this ability to customize is part of the fun! Some recipes have no room for wiggle. This recipe has wiggle room built into its bones, which is nothing but a plus if your family is anything like ours.

Kate has a strong preference for using ground nuts. She considers that the purest example of what hazelnuts really are, and a nice change from all the shortbreads of the world that melt in the mouth without thought. Yours truly is a softaholic. “Melt in the mouth” is a good thing for me, though I will grant that this cookie benefits from the rustic appeal of nut meal rather than whole scale flour.

In a pastry shop, for elegant tea time nibbles? Okay, now we’re back to proper nut flour, probably with each cookie halved in size for the sake of proper, lace linen daintiness.

You cannot lose. It’s all about how you choose to win on this particular day, for this particular situation. Asset, not hurdle.

(NOTE FROM KATE: I enjoyed the coarser texture of the machine-ground nuts for its rustic appeal. They look good, and the one hazelnut reserved for the top is very cute, albeit a bit fussy to position nose-up. I admit, however, that fine-textured hazelnut drops would be just as lovely, yet… slightly different.

Here is some good tricks to keep in mind:

  • We don’t use cookie scoops (not enough room in the drawers), so I like to weigh a few dough balls until I have the size right. It keeps a consistent result every time.
  • When forming, give each ball a gentle squish with the heel of your hand to prevent rolling, and garnish with one hazelnut each. These nuts have a pointy “nose,” which I like to aim in the same direction every time.
  • If you want a fine nut meal, start with raw nuts, then toast the flour on a cookie sheet in the oven at 400 degrees Fahrenheit for 4 minutes. Pull out, stir gently, then toast for another few minutes until its scent JUST begins to develop.
  • Unroasted nuts blanch better, so you will have tidier nut toppers. I tried blanching store-bought roasted nuts and almonds, but to my surprise, the skins wouldn’t slip off!

The big note from Scott? At some point you are going to make the dough and then wonder, “Maybe I should add in some vanilla, or spice, or a tough of extract…” You can, and it will be good, but do us a favor and try it straight up the first time. Lilies look best before they’re gilded.

In all honesty, I very seriously considered a preemptive addition of vanilla before our first test batch. After all, vanilla and hazelnut have a historic love affair, and the dough didn’t have as big a flavor hit as I imagined it would. She Who Must Be Heeded prevailed on me not to, and I’m glad to say she was right. The high temperature oven triggers a lot of browning on the bottoms, which adds the exact thing I had been missing.

CONCLUSION

These really are the Danish Modern of cookie baking. Minimal, sleek, efficient, elegant, easy to customize, and absolutely luscious. Plain old cookies just don’t get any better.

Enjoy!

KRINGLA, Scandinavian Holiday Pretzel Cookies

Yummy and unique.

Happy New Year to all! This will be a relatively short article because all the tips and tricks were so important they’ve ended up in the recipe itself. Twenty of them! More or less. There isn’t a lot for me to add.

NOTE FROM KATE: This would be an absolutely wicked technical bake if they ever appear in the Great British Baking Show a/k/a Bakeoff! With their even, delightfully puffed-up loops toasted golden and their intriguing crunch, they are well worth the learning curve.

Here’s the bottom line: Kringla look exactly like a salted pretzel and have soft middles right after baking. From Day 2 on, they turn into an extremely light, ultra-crisp, crunchy sugar “cookie” with moderate sweetness and an innocent flavor that no one can dislike.

Yes, Hartshorn Makes A Difference

Kringle sorta-kinda work with baking powder or soda, but they turn into something special when you use baker’s ammonia a/k/a hartshorn instead. The texture changes from (A) absurdly puffy when fresh and a little tough as they age, into (B) puffy with a pleasant, crispy crust when fresh and wonderfully crunchy as they age. See this article for the underlying reasons. We can’t say they aren’t worth making if you use the more common leavening agents. The illusion still works, and there’s nothing wrong with the flavor. But they will definitely be better if you make them with hartshorn.

Shaping Pretzels Is A P.I.T.A. – If You Are Me

Kate had almost no problems, because she’s an artist with a good 3-D imagination. I end up staring at the darned things and trying to remember, “Was it one twist or two? And then the ends go where…?”

It’s all covered in the recipe itself, but aside from native talent (or lack thereof), the shaping hurdles are all pretty basic and built into the nature of the cookie:

  • It’s a very soft and sticky dough. But everything will work out fine if you roll each piece in flour before forming, and work with floured fingers.
  • Move the rolled out “snakes” onto your parchment before turning them into pretzel shapes. They’re so soft that scooping and moving will inevitably distort your work.
  • Use very skinny “snakes” and leave a huge amount of room in the loops – enough that they look sort of scrawny and pathetic before they hit the oven. Kringla expand by at least 400% percent as they bake, meaning each of those little arms will end up being four times (4x) as thick by the time they are done. Rest assured: all that empty space will vanish.
  • Keep the pretzels far apart on the trays for the same reason.

NOTE FROM KATE: If you’ve never made a pretzel, I recommend practicing with a piece of thick twine or shoe string. You will want to make a single shape while using up the entire length of 8- 10″. Try various shapes, and try to join the rope under an existing loop. If you can’t, pinch the dough together so that it’s the same thickness everywhere (Thinner portions will darken too much.) The final product is as solid as the dough is fussy. This dough would be suitable for making hearts, flowers, linear animal shapes, or whatever else you fancy.

The Final Touch Decorations Are Easy, But Have Some Sneaky Hazards

Kringla taste perfectly fine. They are friendly, inoffensive, mildly sweet, and basically pleasant to one and all. For a stronger impression, add more freshly ground nutmeg or cardamom. For an even safer flavor, add some extra lemon zest. Either way, this cookie isn’t really about the flavor. It’s the shape that makes them special. The shape, and the illusion of being a salted pretzel instead of a sweet treat.

NOTE FROM KATE: I could be wrong on this, but I perceive hartshorn-leavened cookies as less flavorful than their baking soda/baking powder equivalents. So far we aren’t sure whether it’s just me, or because the extra puff essentially dilutes the spice level per bite. Adjust spice level as you see fit.

That salted pretzel illusion comes from brushing the pretzels with melted butter and then sprinkling the tops with pearl sugar to imitate the salt. The recipe goes over it all in detail, but that process has two basic challenges to overcome. (A) The dough is so soft that brushing it with melted butter can distort those shapes you just spent so much work on; and (B), the oven temperature is hot enough to melt any loose sugar crystals, which can lead to black caramel tainting the bottom of your cookies.

You can fix both problems by baking the pretzels until they are almost done, pulling them out of the oven to be decorated, and then returning them to the oven to finish. That, alas, is both fussy and time consuming. Thus it makes sense to brush and decorate before baking… which means you need to compensate for those two problems.

There is no concrete, surefire answer. It’s just one of those things you need to know about, and do what you can to prevent. See the recipe for various tips, tricks, and hacks you might want to use.

The Pretzel Bottoms Try To Get Out Of Control

Start with an extremely light dough, rolled very thin, and heavily leavened so it will expand by four or even five times in the oven. Add in a very hot oven to brown the top and provide extra crispness to the crust.

What do you get? A cookie that can easily burn on the bottom before the tops are done, even without factoring in any caramel from melted sugar.

Knowing the problem gets you about 50% of the way toward fixing it. Again, please consult the recipe for our tips, tricks, and hacks to forestall that. But I may as well close this article by listing them here as well, because several are very clever if I do say so myself:

  • You can bake one sheet at a time, on a middle or upper rack of the oven. Oven heat comes from the bottom and collects toward the top, so this will make sure you have consistent air flow while maximizing the heat around your crust rather than on your bottoms. Just remember that one sheet in the oven tends to cook faster than two.
  • You can use the convection setting on your oven to achieve the same effect. Just remember to turn the oven down by 25° F (about 15° C).
  • If you use two pans, remember to rotate them halfway through. Bottom to top, while also spinning them back to front.
  • You can insulate the cookie bottoms by using a silicone mat instead of parchment paper.
  • You can also insulate the bottoms by using a doubled baking tray.

NOTE FROM KATE: We have a convection oven but we seldom turn the fan on because all our Volume 1 recipes started out in a previous one. Keeping a traditional oven setting helps us compare new recipes connected to our older bakes. If you use a convection oven, reduce the temperature by 25°F and keep an eye on your bake time. Every oven is different.

Conclusion

Please don’t let all the nits and notes discourage you from trying this fun and culturally important little cookie. Yes there are hurdles, but they’re more in the nature of “heads up” warnings about pitfalls to be avoided. They aren’t actual barriers, let alone walls, and the rewards are more than worth the effort. Kringla are fun! Just look at them:

Enjoy!