
Our collected work on Heritage Cookies of the Old and New World, both Volume 1 and the forthcoming Volume 2, can be traced back to the Czech tradition of Vánoční Cukroví: “Christmas Sweets.” Central and Norther Europe abounds with impressive holiday baking traditions, but no one takes it more seriously, or does a better job, than Czechs such as my beloved wife.
The thing is, when you make a lot of cookies, you also end up with a lot of casualties. There’s just no way around it. Beehive N0-Bakes may be the single best way of converting those casualties into something new. Who am I kidding? History contains a lot of ‘Oops!’ moments just to ensure the Beehives get made.

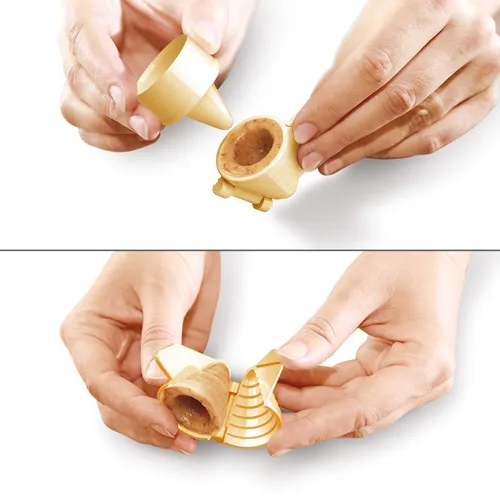
It starts with tiny plastic molds such as this one from the Czech manufacturer Tescoma:
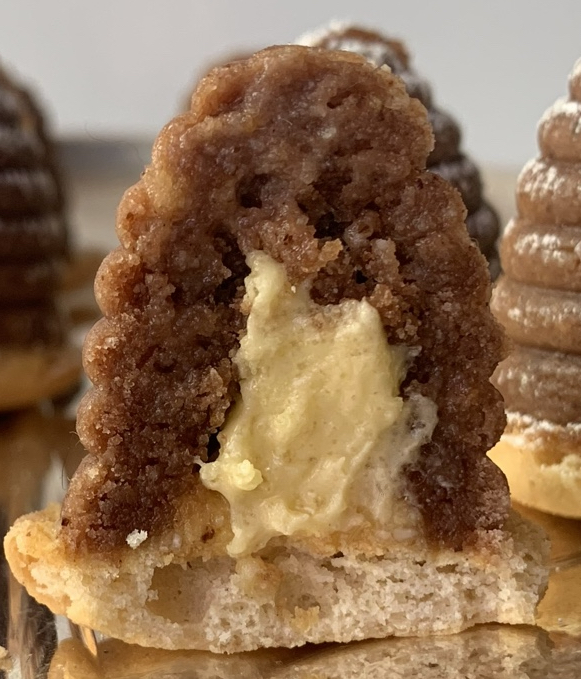
It ends with this:

That picture pretty much says it all. (A) create a dough from leftover cookie crumbs, (b) press it into shape using the plastic form, (C) poke in a hole using the provided stamp, or the handle of a wooden spoon, (D) fill said hole with a stiff, rum-heavy buttercream, and then (E) cover the bottom with a small, round cookie like commercial vanilla wafers.
Quick, easy, fun for children of all ages, and requiring no mandatory baking unless you choose to make a superior buttercream. Or wish to make your own wafers, of course.
Click here if you only want the recipe without the discussion
Part 1 – Ready The Shell
This is the magic part, and it couldn’t be any easier. Start with your leftover cookie crumbs. Mix in finely ground nuts, a small amount of powdered sugar, and egg white(s) as needed to bind it all together. Most people also add in a bit of rum (or extract) and cocoa powder to round things out, but that can vary with both personal taste and the nature of your casualty crumbs. You can also add spices, depending on the nature of your crumbs. Ground up gingerbread cookies obviously have a different vibe than ground up butter cookies.
NOTE FROM KATE: caution on the casualty cookies. Not all will make good candidates! We had some strongly flavored cocoa bear paws that got recycled into Beehives, and I thought there was a bit much going on. I would’ve preferred a more neutral backdrop to the smooth and delicious filling. If we make them again from the same cookies I will vary from the recipe to accomodate.
Regarding the overall impression, I prefer walls as thin as possible, with a liquidy eggyolk cream filling for contrast. But those would soak the Nilla cookie base over time…so if you’re making a whole bunch, a buttercream might be a longer-lasting option. Due to their egg content, we store Beehives in the refrigerator until serving time.
The only place it could go wrong is the proportions. Sometimes the cookie crumbs will be drier, sometimes wetter, etc. The answer is simple: remember your target. You want a standard, slightly sticky cookie texture. Start with something on the wet side and then add crumbs as needed to get there.
Part 2 – Ready The Filling
This is just as easy even though the recipes can vary drastically from house to house. You are after a rich, thick but not solid filling full of extra rum flavor. How you get there is up to you. The filling texture can vary from thick and boozy liquid eggnog to a firmer, properly flavored buttercream.
Kate’s prefers a cheater-buttercream on the theory, “If you are going to make a life hack recipe out of leftover crumbs, why not make a shortcut buttercream?”
- Make an extra-thick, store bought vanilla pudding by using only half the designated amount of liquid.
- Finish by whipping in dark rum and/or rum extract to taste.
I prefer to start from a modified pastry cream, otherwise known as a Swiss meringue method using yolks instead of whites:
- Whip the leftover egg yolks with some sugar over a hot water bath until thick and foamy.
- Remove it from the heat and whip in softened butter piece by piece, waiting each time until the last piece has been fully incorporated.
- Finish by whipping in dark rum and/or rum extract to taste.
The third approach is a French Buttercream, otherwise known as an Italian meringue method using yolks instead of whites.:
- Whip the yolks off heat until thick and foamy.
- Slowly drizzle in a softball-stage sugar syrup (235°-240° F = 114°-115° C), whisking on “high” until the temperature drops back down.
- Finish by whipping in dark rum and/or extract to taste.
The Flavor Profile – Does It Need To Be Rum?
We’ve written before that Prague’s secret heart belongs to a combination of nuts, rum and mocha. This recipe has (let’s see…) nuts and cocoa powder in the crust, with rum in both crust and filling. No surprise there!
There is no rule requiring you to stick with that profile, any quick online search will reveal many variations, and you always need to adapt things if your cookie crumbs come from something that has a lot of character. But for plain beehives made from plain cookies, please consider mocha-rum as the home base. That’s what you’d find in the Czech Republic.
NOTE: 100% rum extract starts to taste a bit artificial. We like to mix dark rum and extract together in order to obtain an intense flavor that still has nuance. And a bit of booziness of course!
Part 3 – Construction
Press dough into your little beehive mold:

an unfilled one on the right
Poke a hole in the bottom using either the tool that came with your mold, or the handle of a wooden spoon.
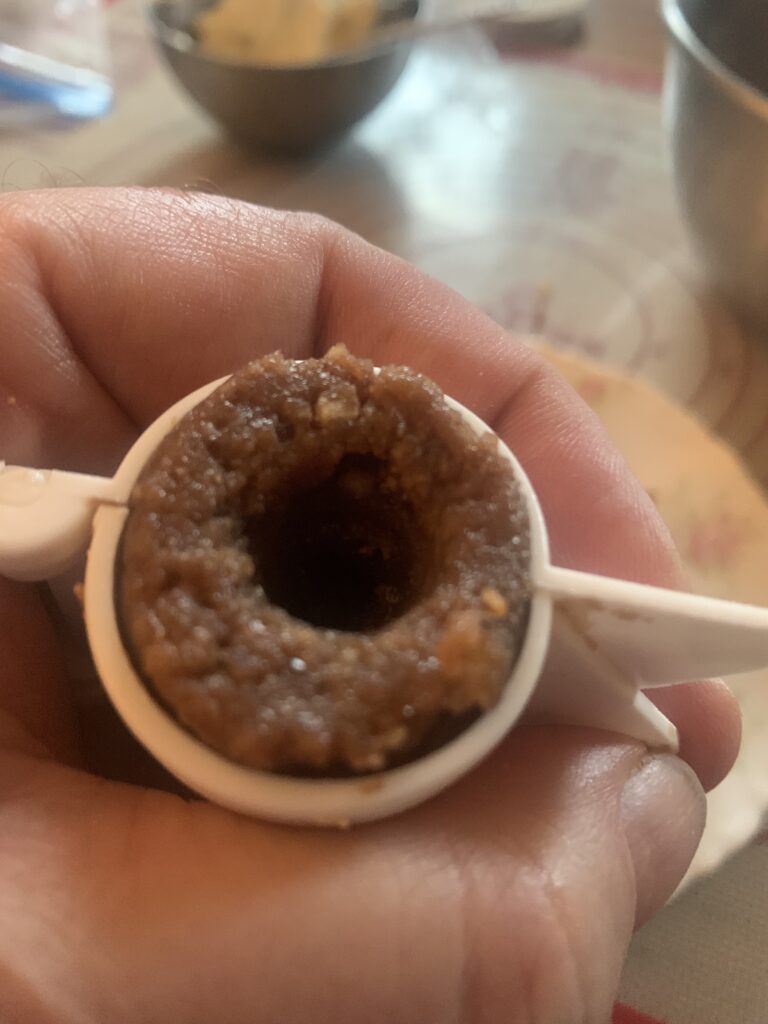
Fill the hole with filling.

Cover the hole with a small, round cookie. We typically use commercial vanilla wafers from the box.

Unmold. One side of the mold will come free easily. Use the cookie on the bottom to help free the other.

Move your finished Beehive Cookies to the fridge, where they will keep well while the cold, dry air hardens the outer crust and makes them that much more cookie-ish.
Storage and Conclusion
No-Bake Beehive Cookies:
- Turn casualties into capital;
- Look amazing;
- Have a distinct and often different flavor from everything else on your tray;
- Taste delicious;
- Are easy to customize (almost unavoidable);
- Occupy a distinct part in an important baking culture; and
- Are fairly easy to make.
Can someone please explain the downside?
okay, yes. You may have to put them into a mental “Not-Quite-A-Cookie” category. And yes, that can cause some family friction about where they belong in your forthcoming cookbook. But they’re good. That is the bottom line.
Ah, the burdens of life…
Enjoy!