CHOCOLATE COVERED MARSHMALLOW TREATS – Part 4, The Sticky Problem of Chocolate Dip

Today you get a big, fat note from Kate, because I’ve somehow become the family chocolate dipper.

Oh, we’ve all tried it, and we all have our tricks. I’m the one who gets to share the final results with you, though, because I strongly believe in the Power of Chocolate. It is, after all, its own separate food group!

[NOTE FROM SCOTT: It also has magic powers. I know this from long experience with both a wife and two daughters. “Just stand back and throw some chocolate at her” isn’t a joke, it’s a survival mechanism. The masculine life expectancy in America soared in the late 1890’s and early 1900’s. Hershey’s went into business in 1894. Coincidence? You lay your bets, and I’ll lay mine.]

As always, you can skip to the bottom if you’re only here for the recipe

We’ve been dipping various cookies in chocolate for years, as evidenced by the recipes in Volume I of the Heritage Cookies Cookbook. A careful observer may notice that the quality of our chocolate dip in some of those photos isn’t nearly as smooth and shiny as commercially made products. There is a reason for that. First, we are home bakers, not chocolatiers.

Sure, I could invest into (a few more) additional pieces of equipment. Then, because tempering chocolate is best done at volumes larger than we usually use, I could sink an inordinate amount of money into ingredients only to learn how to temper chocolate properly. But… really?

Friends, chocolate ain’t cheap. Never was. And neither is time. Therefore, I am forever grateful for every little trick, as well as for those immense bricks of good-enough, affordable chocolate from Trader Joe’s. They do a pretty good job for most our applications. For fussier cookies we’ll buy Callebaut or Valrhona, and for convenience, Scott is willing to use those commercially available chocolate melts. But that doesn’t get us into the main point of this article.

Why is high-quality, commercially produced chocolate so pretty and shiny, and how can one do that at home? I’m not a chocolate expert so I’ll give you the shorthand as I understand it.

Cocoa butter, the off-white fat that forms the bulk of the chocolate we eat, crystallizes into several different forms. Of those, the beta-crystals are the ones that produce a smooth and shiny surface. If you melt your chocolate under exacting, well-controlled conditions, working the softened product under controlled humidity, concentration, temperatures, and timing, you will end up with tempered chocolate. Such conditions can be achieved for the home baker, but they require low air humidity, a large marble or granite board, and a certain minimum volume.

Plus, of course, practice.

But there is a shortcut! Properly tempered chocolate is chock-full of beta-crystals. It snaps upon breaking, and the break is smooth instead of crumbly. The chocolate’s surface shines with that undeniable gleam of quality and good taste.

Commercial chocolate makers, who process tons of material, have their processes tightly in check. The less-expensive brands also stretch their batches with extra fillers (powdered milk and lots of extra sugar), flavorings, emulsifiers, and various fats to act as melt conditioners. You will notice that cheap chocolate has a list of ingredients as long as Twinkies, whereas high-quality chocolate will have fewer than you can count on your fingers.

Technically speaking, the final product requires only cocoa butter, cocoa, and sugar. But there is an inexpensive, readily available product that works even better if you are willing to turn a blind eye toward certain other factors.

To Palm Oil Or Not To Palm Oil, That Is The Question

Palm oil is entirely edible, tasteless, inert, and has a combination of high molecular weight and melting characteristics that allow you to easily thin chocolate enough to produce a hard, thin layer at room temperature. These properties, its low cost, and its ability to substitute the more expensive cocoa butter, makes it ideal for a whole slew of commercial applications.

NOTE FROM SCOTT: Wilton, the maker of Candy Melts™ sells a product called “EZ Thin Dipping Aid.” That is the product to use if you’re willing to go the palm oil route. It works like a charm and is the perfect solution used across the board by the baking industry. So why do we go to all this effort to avoid it? Well…

Coatings, fillings, cakes – even tortillas! Palm is an incredibly useful product for a host of culinary purposes; so useful that human greed has gotten involved to change the calculus. Entire tropical rain forests were cut down to make space for palm plantations, where brutal working conditions approaching slavery are routinely employed. And there is absolutely no way to source palm oil from only the “good actors.”

Understand: palm oil is no worse than anything else from the chemistry and biology points of view. It is a fat, with all the pluses and minuses that entails, and a particularly desirable one because of its unique characteristics. But our family will not willingly contribute toward either environmental devastation nor human degradation, and so palm oil has now become a product that we actively avoid whenever possible. You will not find it in any of our recipes until we’ve been convinced that the problems were solved.

If Palm Oil Is Out, What Then?

So what do you do when you’ve ruled out the cheap, convenient, and chemically ideal ingredient as your melting aid? We ended up resorting to the more expensive, natural and equally ideal cocoa butter. You know, the stuff that actually belongs in chocolate!

A quick online search revealed that cocoa butter is available in convenient melt discs. A purchase under $20 lasted us through great many chocolate projects, so a little goes a long way. Make sure to get the food-grade, as many less-expensive brands are intended for cosmetic use only.

What did we try before cocoa butter?

“Everything.”

It feels like it, anyway. Butter, cream, and various oils all got a whirl in our kitchen. Our younger daughter is a great fan of coconut oil as the magic ingredient for the “magic shell” used to coat ice cream. That texture is exactly what you want for Chocolate Marshmallow Treats too, but it just doesn’t work at room temperature. The coating stays solid when it’s down at ice cream temperatures, but it turns tacky on cookies and becomes downright runny if your room turns warm.

Butter and cream will also lower viscosity (i.e., the chocolate melt is thinner) but they won’t give you that shiny surface and can also remain sticky. Vegetable oil works to thin the result and it helps the melting process, but the chocolate remains even runnier because the melting point is that much lower.

We found that cocoa butter was the only alternative that really worked. It has the right combination of both melting point and melt properties to help soften the chocolate thin it for a good dip – but also gets hard enough to avoid being sticky at room temperature. Think of every other chocolate! They melt in the mouth, not on the plate.

But What About The Pretty, Shiny Part?

Aha! You want to grow beta-crystals.

Think back to that sugar crystallization experiment from elementary school. You coated a wet string in sugar crystals, put it into the saturated liquid, and then watched the crystals grow over the next few days. Those initial crystals were key to giving a platform for the crystals to form. You had to seed the string.

In exactly the same way, you can seed your microwave-melted chocolate with beta-crystals by adding solid grating of an expensive, shiny, properly tempered chocolate you bought at the store. If you fail to do that, the chocolate won’t look shiny after it sets. A day or five later, depending on how humid it is, you’ll notice the chocolate’s surface breaking into light and dark structures. The chocolate is blooming with the growth of unwanted, non-beta crystals.

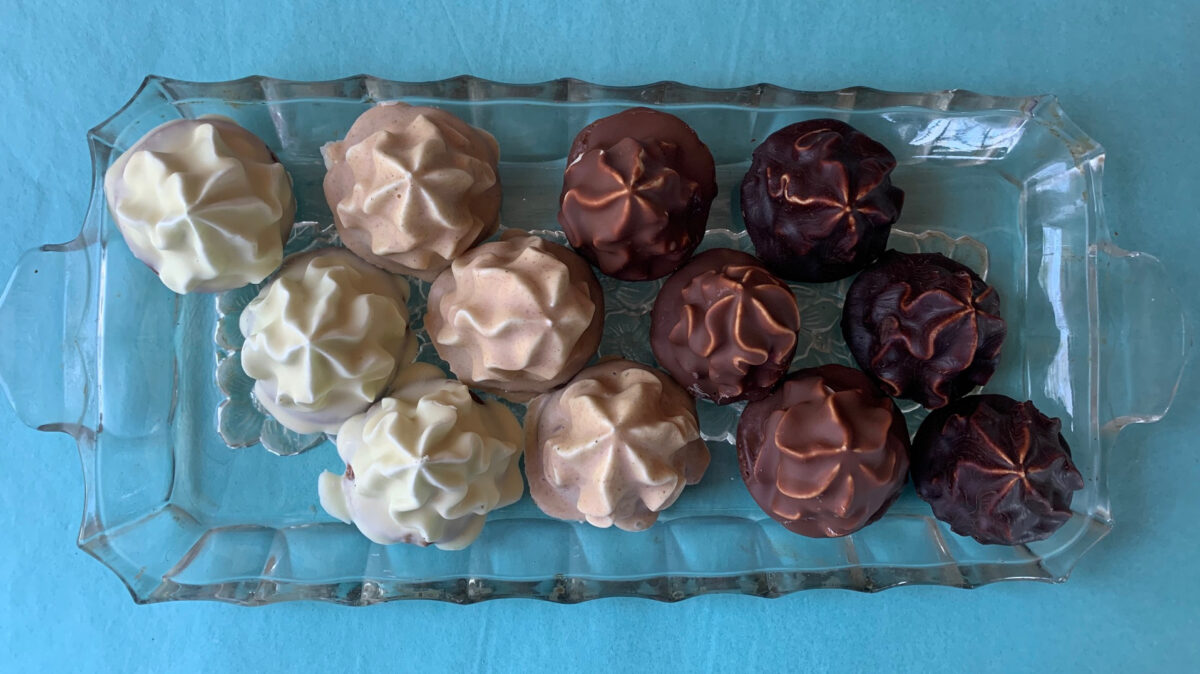
Compare the two enrobed treats in the photo below:
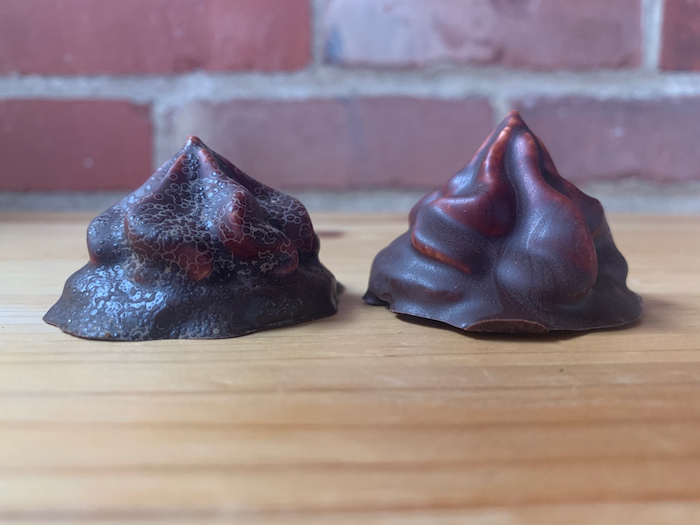
So here you have it. You will find that white chocolate melts differently from all other chocolates, because it has a slew of various other ingredients. I had to add more cocoa butter to help it melt and got a thin coating as a result. Milk chocolate is the best-behaved and least likely to seize. Which brings us to a sticky situation:

What If Your Chocolate Seizes?

Seizing refers to a phenomenon where you are melting chocolate, stirring it, and it suddenly thickens into a grainy, thick, clay-like mass. Seizing occurs when a droplet of water accidentally splashes into your melt. A steamy kitchen has been reported as a culprit in cookbooks. The cocoa butter crystallizes into the “wrong” crystals, locking its structure into something you can’t easily use.

Overheating your chocolate will make it more prone to seizing. The darker the chocolate, the easier it is for it to seize, too.

But there is a fix: Add boiling water one tablespoon at a time, stirring vigorously. The water will dissolve the structure of the crystals, and give you a chance to melt-and-seed as described above.

This being said, I have not tried to make chocolate coverture with a melt that has seized and been rescued. I don’t know how the final product would set, and whether it would bloom or not. However, this chocolate can be used for any other melted chocolate application. If you make ganache, you can save it for a cake filling, brownies, or truffles you’ll probably be making down the line.

I hope this helps. Keep playing with it and expect to have a ruined batch every so often. Since no chocolate is wasted unless you burn it, this experimentation is a low-stakes learning curve. Let us know how this worked for you, and please share tips of your own!

NOTE FROM SCOTT: As you might expect, we made a lot of coated treats in the process of recipe development over the past several months. A lot of them looked perfect when made, and perfect the next day, but mysteriously bloomed after a few days out on the table by the window (we being too lazy to store them properly). Poor Kate was beside herself, figuring that all her careful work had gone wrong. (NOTE FROM KATE: Not “beside myself.” I am entirely too cool a cat for that. More like, pissed off and frustrated. This might have something to do with the fact that I dejunked our excess storage containers 😉

Then, one late morning, en route to a work-break bit of snitching, I noticed that the cookies were positively glowing in the sunlight; and made my fingers sticky in an extremely tattle-tale way. Aha! The penny dropped. The chocolate coating was heating past the critical stage and then re-hardening in a random way without the benefit of beta crystals to guide the process! The result? A coating that bloomed with big white splotches after it rehardened.

It tasted just as good before and after. I assure you; I tested that feature thoroughly, and with great attention to detail. But it is a lesson to remember. Leave your chocolate out in the sun, and it will lose its temper, have a tantrum, and go all white in the face.

To Mold Or To Pour?

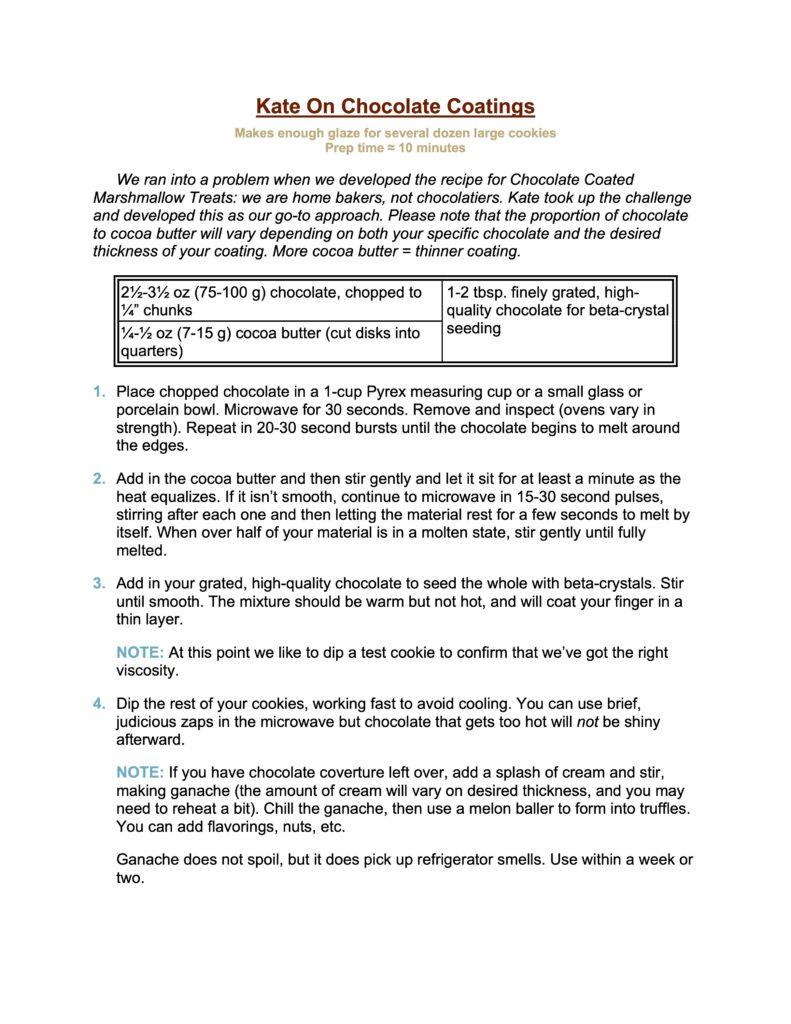
The neatest solution is to spend a few bucks on a silicone chocolate mold. Paint the inside of that with your chocolate coating, set it aside to harden, and then fill it with your marshmallow. Top that with your cookie, or some complementary jam and then your cookie. Chill a little more, and then unmold.

Perfect every time unless your coating somehow sticks to the silicone.
THE CHOCOLATE MARSHMALLOW TREATS SERIES

Part 1, The Chocolate Marshmallow Treat Overview

Part 2, The Cookie Base Options

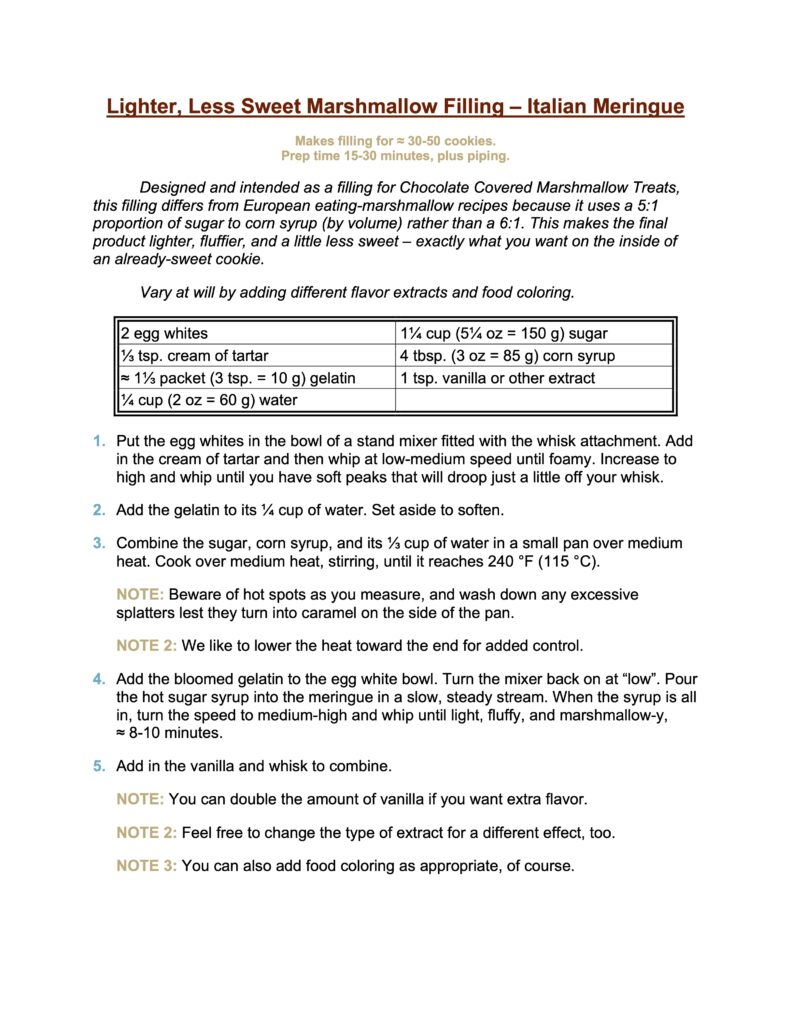
Part 3, The Marshmallow Filling Options

Part 4, The Chocolate Coating and Finishing Options

Part 5, The Strange New World of Fruit-Based Zefir Marshmallows
CHOCOLATE COVERED MARSHMALLOW TREATS – Part 3, The Marshmallow Filling Options

Part 3 of a 5-part series about those chocolate coated treats you adored as a child. This examines the marshmallow fillings.

Part 1 of this series provided an overview of this massive project, with some notes about the problems we ran into.

Part 2 listed several recipes we developed for different cookie bases: Vanilla, Spice, Graham Cracker, and Shortbread. You can also use a thin cake round, but we left that one out because this is, after all, a project devoted to heritage cookies.

This Part 3 examines the two main approaches to creating a marshmallow filling. There is a third approach too, for fruit-based Zefir marshmallows, but I’ve moved that discussion over to its own Part 5.

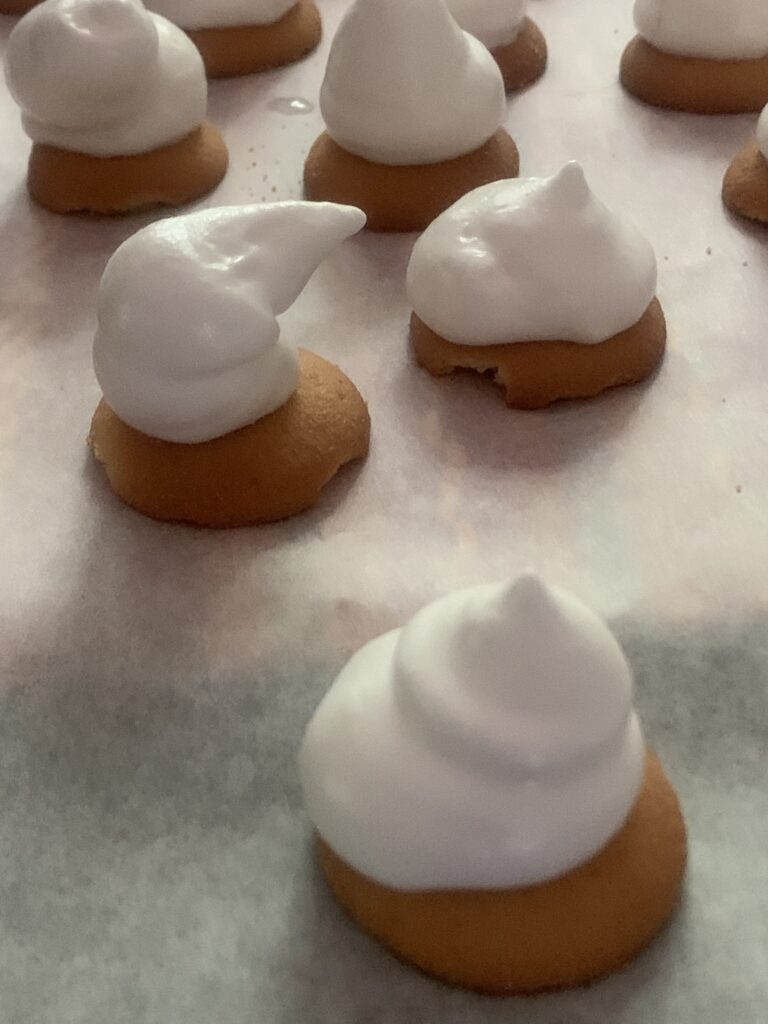
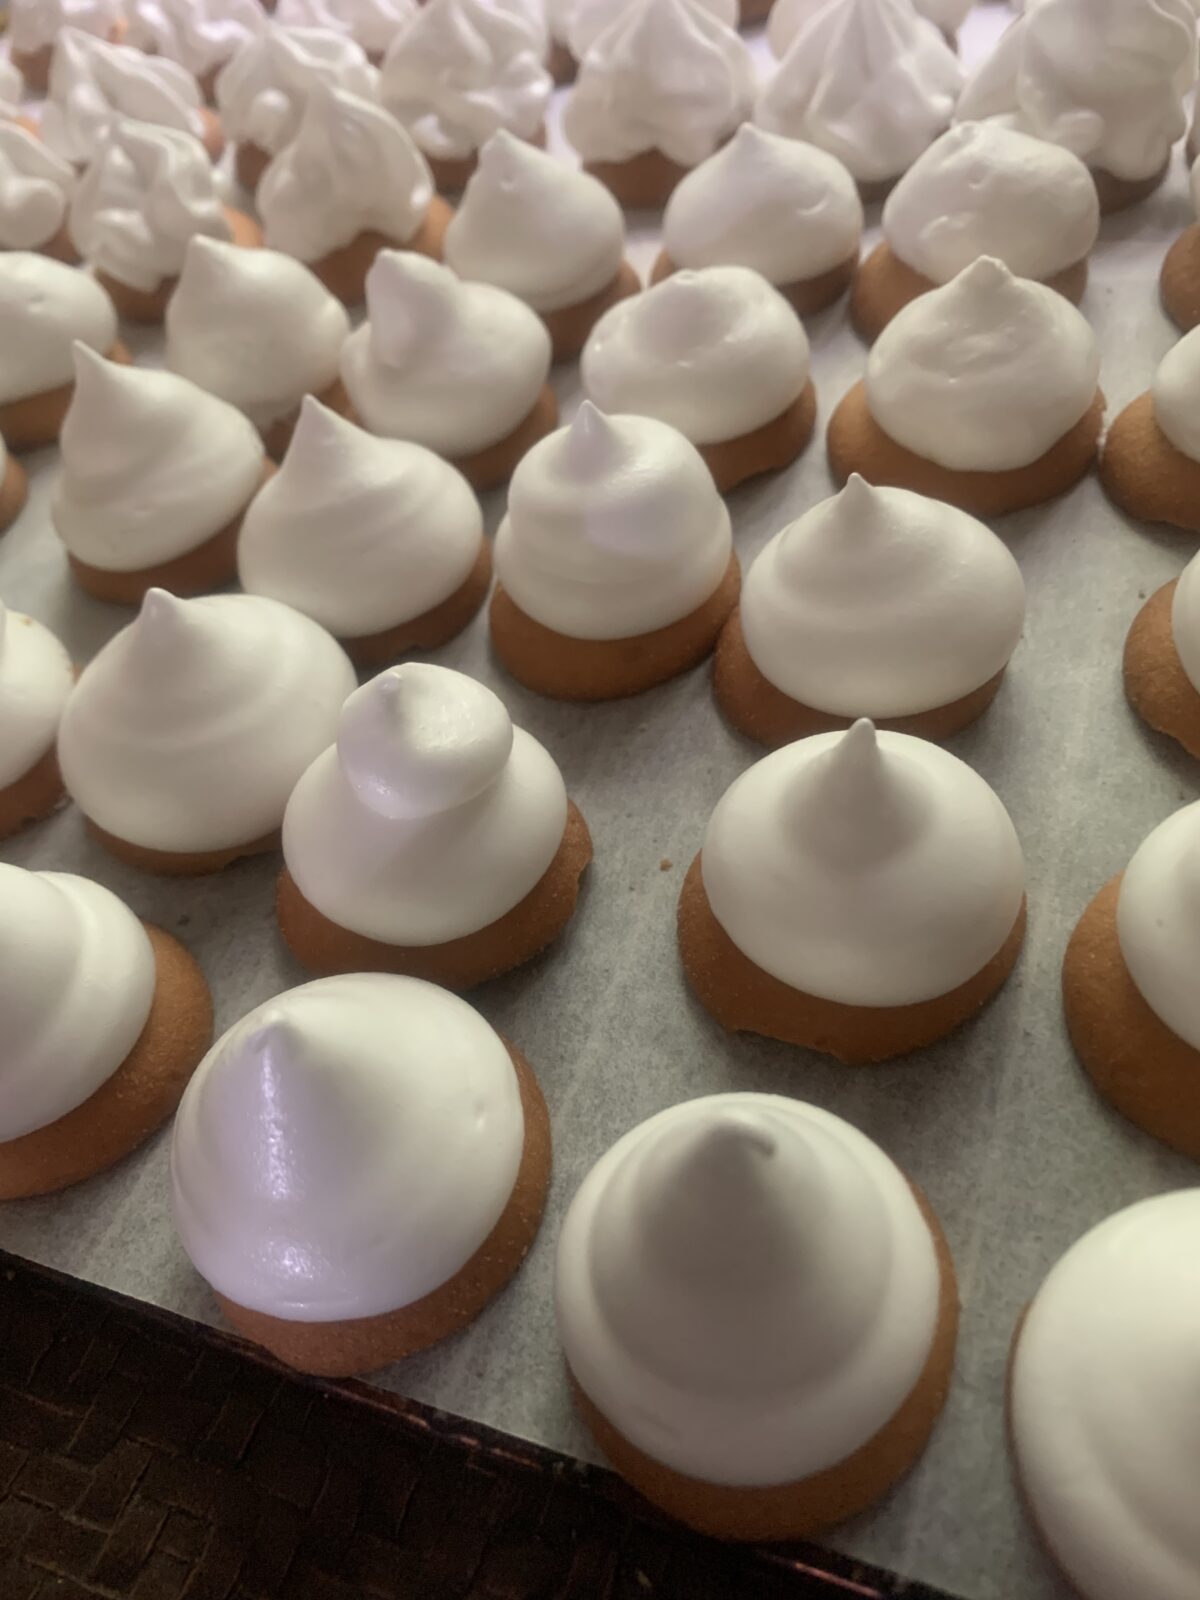
Piped with a round tip onto commercial wafers
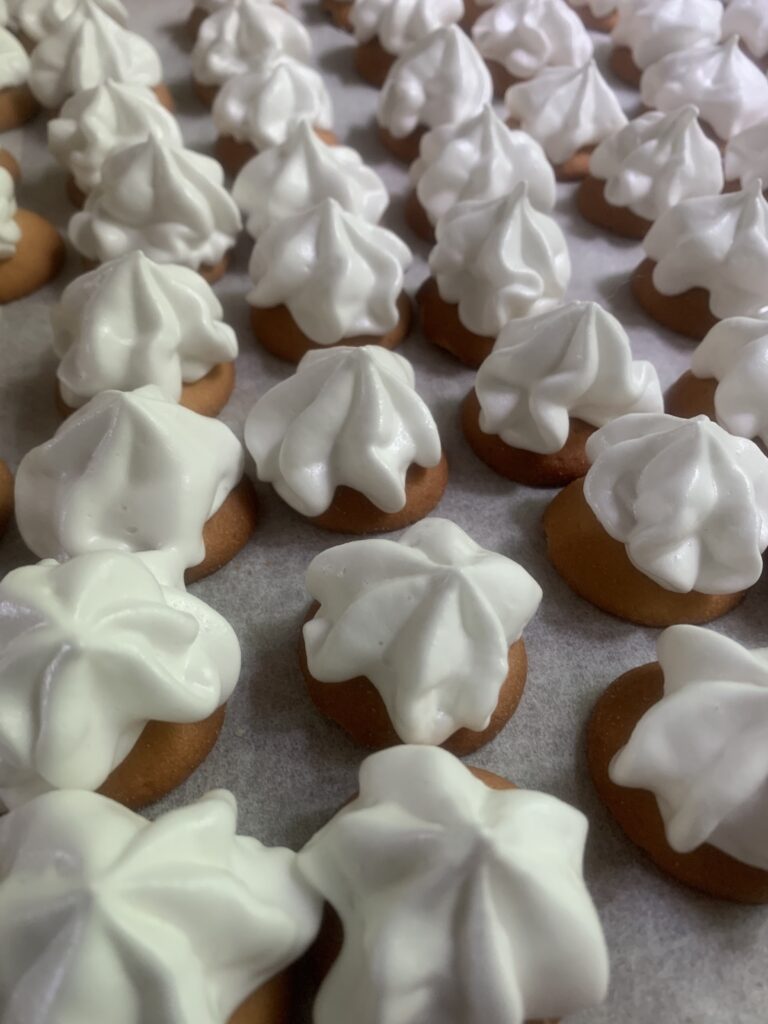
Piped with a star tip onto commercial wafers
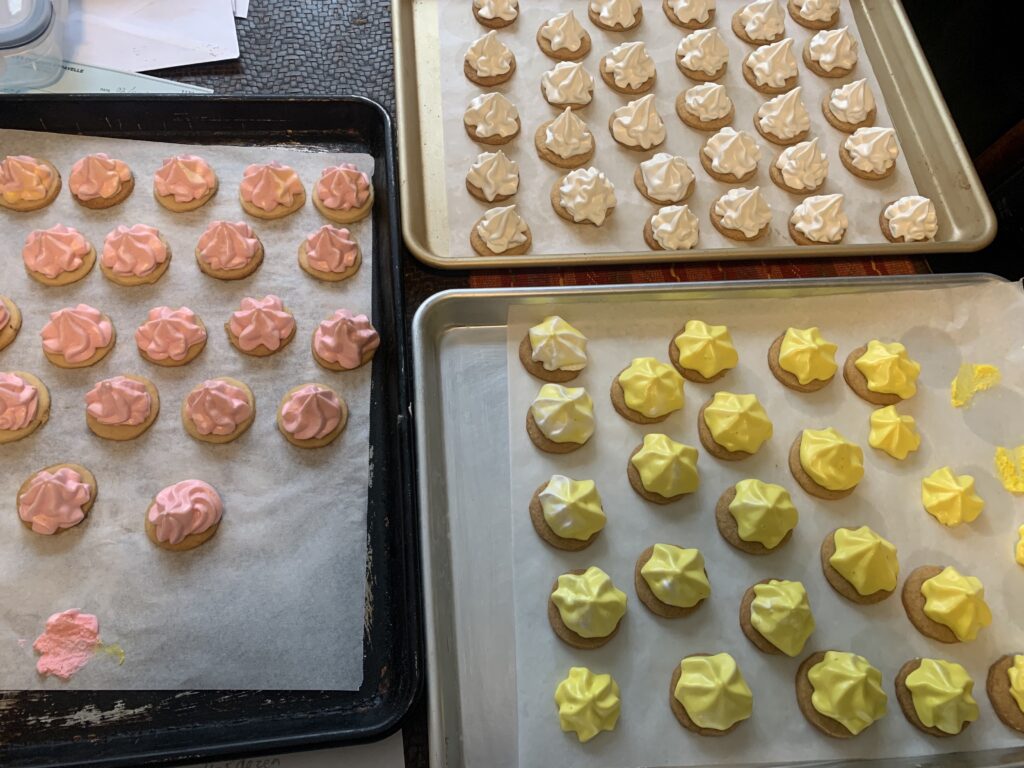
Rose, Vanilla, and Banana on homemade Vanilla Snaps. Color coded with a few drops of food dye.

As always, skip to the bottom if you only want the recipes. The rest of this article digs into the process behind those final results.

The Internet offers a metric ton of recipes for homemade marshmallows, most of which work pretty well. They’re the world’s easiest candy. Basically:

  1. Start with a thick and sticky substrate (made from the marshmallow plant in antiquity);
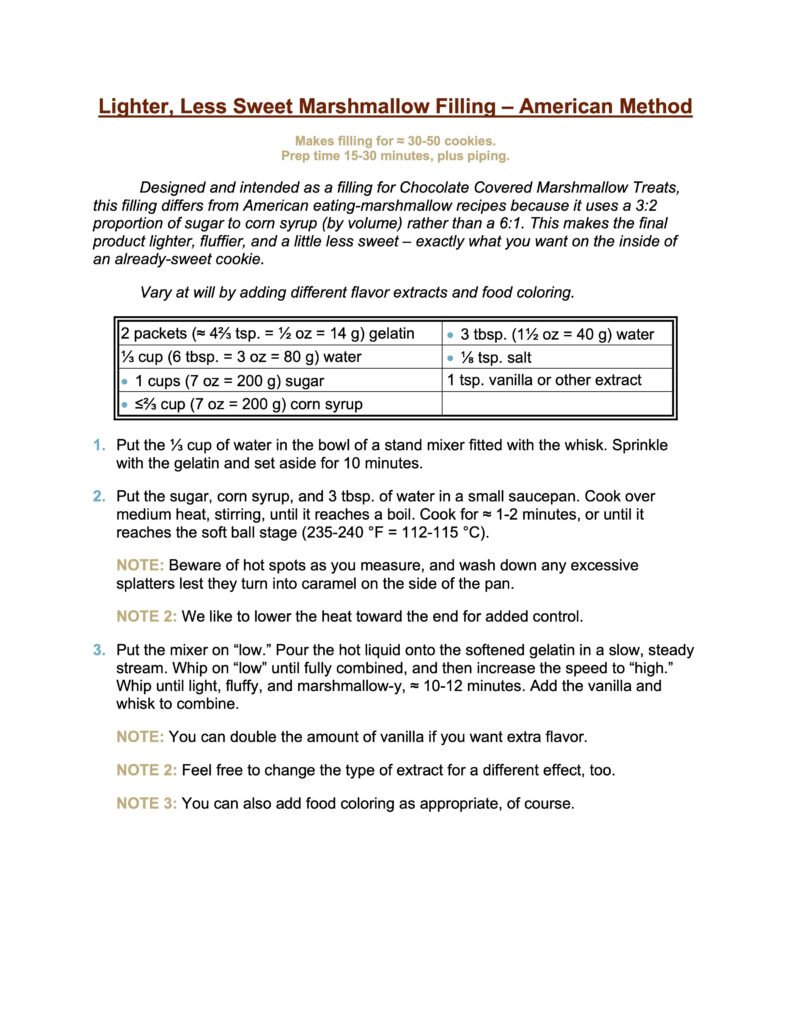
  2. Heat a sugar syrup to the soft ball stage (235‑240 °F a/k/a 112-115 °C), using a combination of table sugar (sucrose) and corn syrup (glucose) syrup to prevent crystallization; and then
  3. Whip the sugar syrup into the substrate until it balloons up to create fluffy marshmallows. These can be piped while warm, or else cooled in a pan to make cut-out eating marshmallows.

The American version uses a lot of gelatin to make that sticky substrate. The European version uses whipped egg whites with less gelatin; i.e., is a gelatin-strengthened Italian Meringue. NOTE: French meringue is egg white whipped with sugar; Italian meringue is egg white whipped with hot sugar syrup; and Swiss meringue is egg white heated to around 170-175 °F (76-79 °C) before being whipped. Swiss is stiffer and more stable than Italian, which is stiffer and more stable than French.

Problem #1: The filling was denser and sweeter than we wanted.

Think of a classic marshmallow you eat out of hand. They have a distinct chew to them, right? It’s part of the appeal. Now think of that chocolate covered marshmallow treat you grew up with. Much less chewy! And a bit less sweet, because flavor also comes from the cookie base and the chocolate topping. The The cookie would not be perfect until we got a handle on the problem.

Fair enough, but how do you change a marshmallow recipe to achieve those targets? It can obviously be done – the commercial products prove that – but we had to figure out how. And that was a major pain in the whosis, because our expertise on the baking side did not extend into this kind of candy making and sugar work.

The first and most obvious solution (cutting cut back on the amount of gelatin) proved to be impossible. Cut back too far and the structure dissolves rather than getting lighter, and I could not fidget my way into a perfect balance because kitchen scales only have so much precision. Plus the marshmallows were far too sweet for this use, and cutting back on the sugar too created other textural issues. I fought this problem for months, and ended up with a pair of solutions that work hand in hand.

Kate gets 100% of the credit for the first. She noticed that our trusty stand mixer began to really strain as the marshmallow mix cooled down. Part of this came from how the filling thickened as it cooled, but the overflowing bowl factored in too. Her solution? Shrink the recipe by a third. Huge difference. The lower volume resulted in a fluffier marshmallow because the machine wasn’t slowing down, and also because the bowl had extra room to accommodate it.

I claim credit for the second solution. I posted the question on some Internet groups/boards, and no one seemed able to help. All I got were suggestions for vegan substitutes that could be used instead of gelatin. That wasn’t the issue! Vegan shmegan; I just wanted to know what was going on in the chemistry, and how to adjust it. One long-suffering volunteer finally burst out with, “maybe you should take a food science class or two.”

Ding ding! For some reason I’d done all my Internet searches using the words “chemistry,” “physics,” and descriptions like “fluffier” and “denser.” I’d never done one using the term “food science.” Why not try? I did, and up popped this lovely article on a project for grade school science teachers: “Sweet Science – Making Marshmallows.” I urge you to read it, but here’s a quick summary in case you want to save some time. Loosely translated, the project reads as follows:

“Have your students make marshmallows with different proportions of sugar to corn syrup, and then measure the characteristics. They’ll find out that more sugar equals a denser and sweeter product, while a higher ratio of corn syrup reverses that. Then you can let the kids eat their experiment, and send the sugared-up darlings off to some class with a colleague you don’t like.”

Okay, I added that last last sentence on my own. But look at what it says! Lighter, and less sweet. Exactly what I wanted. We did the experiment; it worked just as predicted; and the results now appear in the recipes below.

Plus there’s this: Now you have the power too! By way of reference, American eating marshmallows have a sugar:syrup ratio of 6:1 by volume. That’s now at 3:2 for the cookie filling, which coincidentally works out to just about 1:1 by weight. This is just about perfect for us, but you can fuss with it to your heart’s content to find the proportion that’s perfect for you. Tastes differ. Though it must be said that we achieved a texture so “right” that our testers actually singled it out for special compliments! Yes, you really can tell.

Problem #2: Piping the Marshmallow was a P.I.T.A.

There’s no easy way to say this. I suck at piping. And that is a problem because this is a recipe where you need to work quickly. Cooled marshmallow filling stiffens, is harder to pipe, and tends to mound up unevenly instead of covering the whole cookie in a pretty layer. Nor does it help that our biggest piping bags are “mediums” on anyone else’s scale. Even the reduced recipe required us to refill the bag two or three times, which led to the filling cooling off that much faster, and becoming that much… You get the idea.

Marshmallow gets stiffer as it cools, and won’t pipe out cleanly.

In the end I found three solutions that worked pretty well.

  • Scott’s Solution. Rope in Kate or a daughter to cover for my sorry efforts. This works perfectly, and I recommend it highly.
  • The Doh! Solution. Buy a bigger bag. Maybe next time. They aren’t as easy to find as you’d think.
  • Solution #3. Prepare two or three of the medium-sized bags before you start to pipe the cookies out. This saves a few critical minutes, and also lets you use more than one tip.

Yes, I am overselling the difficulty a bit. Anyone with the right tools and some basic skills won’t find it as challenging as I did. The multiple-bags approach also solves a lot of the problem, and the cookies taste just as good even if the marshmallow cools enough to come out lopsided. Still, forewarned is forearmed. Be ready to pipe as quickly and efficiently as you can; and/or to laugh at your funky shapes.

Problem #3: The Infinite Variations

Continuing the theme from Parts 1 and 2, the marshmallow filling can also be varied in as many ways as your imagination permits. And it’s super simple to do!

So-called “plain” marshmallows are flavored with vanilla extract. An even teaspoon works perfectly at these amounts. “Flavored” marshmallows replace the vanilla with with any extract and/or food color that’s buried in your spice cabinet, and that same 1 tsp. will do the job just as well. Lemon, rose, rum, banana, coffee, mint, almond… there is some place in the world where that flavor of marshmallow is a beloved favorite sold in stores. I recommend some color coding to avoid frowns of confusion, but it really is that easy.

Spices work too but we found that spiced cookie bases were easier to control. Marshmallows have a ton of air, and adding enough spice to provide solid flavor can make them a little gritty.

Fruit flavors are a little different. The extracts work fine for a properly artificial flavor reminiscent of commercial products, but you can also get The Real Thing by making Zefir instead of a classic marshmallow. Talk about intense essence of fruit…! But that’s getting ahead of myself. I moved that discussion to Part 5 for very good reason, and you’ll simply have to wait.

CONCLUSION

It took some serious work and research to nail down the filling part of this cookie, but that really came down to exploring things at the food science level. [It had nothing to do with me being obsessive, no matter what my piping assistants may say!] If you follow the recipe below – either one – you will find it quick, easy, and effective. You’ve got your wheel, and there’s no need to recreate it.

So where are we at?

  1. Make a simple cookie base, flavored in any way you can imagine.
  2. Pick your choice of marshmallow approach, and flavor it with any extract or liqueur in your cabinet by substituting 1:1 for the designated vanilla, and color coding with a touch of food dye.
  3. Pipe your marshmallow creation onto your choice of cookie, using your choice of piping tip.

Bing, bang, boom. You’ve got these Chocolate Covered Marshmallow Treats 70% done. All that remains is coating them in everyone’s favorite darkest-brown food of the gods.

THE CHOCOLATE MARSHMALLOW TREATS SERIES

Part 1, The Chocolate Marshmallow Treat Overview

Part 2, The Cookie Base Options

Part 3, The Marshmallow Filling Options

Part 4, The Chocolate Coating and Finishing Options

Part 5, The Strange New World of Fruit-Based Zefir Marshmallows

VANILLA SNAPS AND WAFERS – a classic cookie and ingredient

The classic, with versions for eating out of hand or for using in other recipes

Here’s another head smacker cookie really should have gone into Volume I but somehow escaped our notice. It came up now in a sideways fashion. We’ve finally gotten around to working on Chocolate Covered Marshmallow Treats. You know that cookie. Everyone does. It’s the one you loved as a child, with a simple cookie base that has marshmallow on top, and is then coated with a thin chocolate shell.

That cookie has scores and scores of different version around the world, but the most common uses some equivalent to a Nilla Wafer® base. So that meant I should start by making… Doh! I’ve never actually worked up a homemade version of Vanilla Wafers. [Sigh]

The result was all we could have hoped for and more. In fact, we discovered that it isn’t a single cookie. It’s actually three.

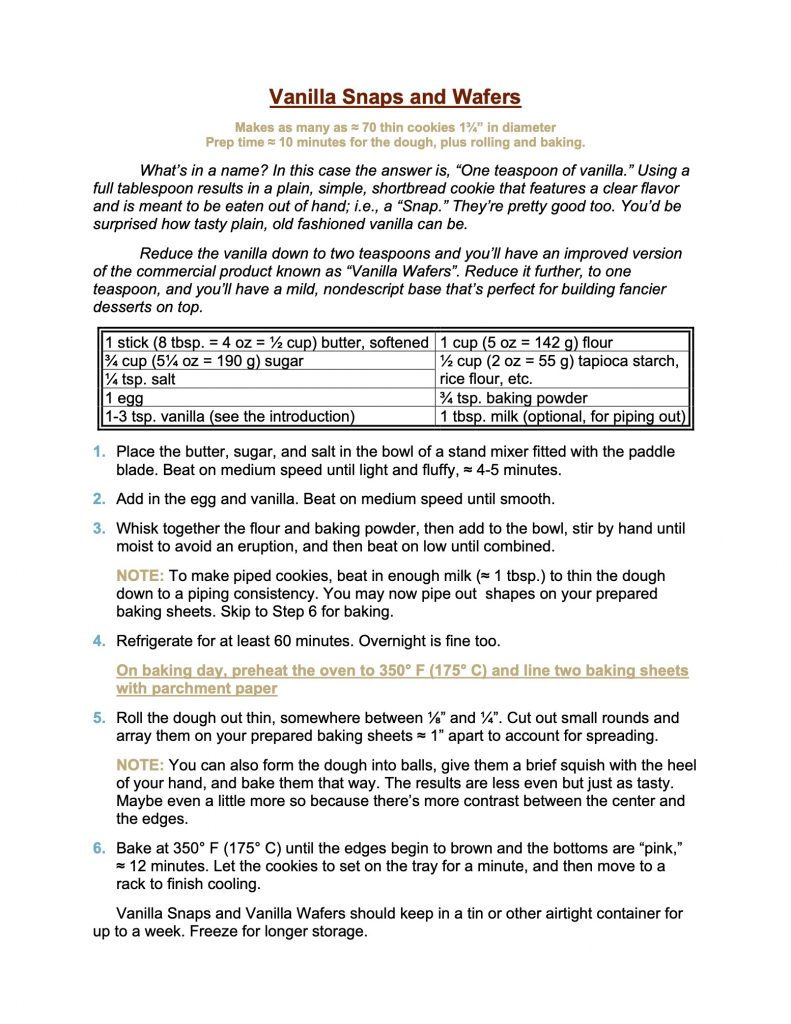
  1. Use the full amount of flavor and you’ll get a very pleasant cookie to eat out of hand, that adults will enjoy as much as children.
  2. Use a moderate amount of vanilla, and you’ll make something very close to the commercial product. Just better in every way. Real butter and real love make a real difference. Kate says that toddlers in Prague were fed a similar cookie whenever treats were earned.
  3. Reduce the amount of flavor all the way, and you will get the plain, invisible cookie that’s perfect for all the “other” uses these get purchased for. Banana Pudding; El Cheapo Tiramisu; Chocolate Marshmallow Treats; etc., etc., on and on, and suchforth and suchlike.

As always, skip to the bottom if you only want the recipe

This is a simple cookie, and it’s meant to be a simple cookie, so I’m going to try to keep the discussion brief. There weren’t many issues that needed to be addressed. It was really a matter of focusing on what we wanted the cookie to be.

First the Eggs

I wanted this to be a light, crispy cookie with a fair amount of air, that would taste a little buttery without coming off as rich. Most recipes in our books and online resources called for one whole egg to go with each stick of butter. I tested that, along with one egg white, and one egg yolk.

The whole egg won handily, both for ease and flavor. Yes, you can make a good cookie with both egg white and egg yolk, but the whole egg is simpler and, for this use, better.

Wait; Haven’t We Made This Before?

For crying out loud! Butter cookies. Sugar cookies. Shortbread. Alfajories. Spritz Cookies. Snaps. They’re all pretty much the same, right? Just butter, sugar, flour, starch, and egg in slightly different proportions, plus a hit of flavor. Was this one really different, or just a variation on one of our existing and already-tested recipes?

Well… no. I went back and crunched the numbers. These are in the same family but the proportions are distinct enough to earn their own name. Same for the classic French cookies we plan to work up someday, such as Langue du Chat (“Cat’s Tongues” a/k/a Homemade Milanos®), and Tuiles. Those use several egg whites to create a different species within the same genus.

What’s In A Name?

All that recipe comparison work did clarify one thing that was bugging me. These are not a “wafer”!

I am a lawyer in my real life, and have been for 30 years. So I can speak for my profession when I tell you that virtually every non-criminal problem I see comes down to a variation on the theme of frustrated expectations. Person X thought s/he deserved or would get an “A,” ended up with a “B”, and grew angry at that result. So Person X goes back to Person Y to complain, “where is my A?”, and the situation then grows worse because Person Y insists that s/he meant “B” all along. And most of the time both interpretations fit the actual words.

The solution? Define your bloody terms so you can at least know where you really disagree! Try it the next time someone wants to argue about politics. “Exactly what do you mean when you use that word?” You’ll be shocked at how much of your fight disappears, or at least settles down to the amicable question of how words ought to be used.

In any case, I have spent a lot of years getting frustrated over that stupidity, in both my profession and in politics, so I get a little [ahem] picky about calling things by their proper names. A “wafer” is an extremely thin, usually broad cookie like our different Snowflake variations, Tuilles, or Lace Cookies. You can get to that result in many different ways, but that’s the definition.

This cookie does not meet that definition, and thus it isn’t a “wafer.” This cookie is a “Snap”. Harrumph.

We define Snaps as any plain, simple, round cookie that features a clear and focused flavor. Cardamom, Anise, and Black Pepper Snaps feature a single spice. Ginger snaps feature a spice mix with a touch of molasses. But that is the family group, and that is where this cookie belongs. Harrumph I say again! And harrumph for good measure. Harrumph. Harrumph. Harrumph!

Alas, but the outside world does foolish things on occasion. Sometimes it will even [gasp!] ignore it when some large company mislabels what ought to be a Snap as a Wafer. And a wise man has to know his limits. So let us agree on a simple formula, okay?

First, I am in the right. Harrumph. And that means the world is wrong. And thus equity, justice, and fair play are unanimously on my side.

Next, I am not being petty no matter what certain females in my household may choose to imply. Nor childish. Not, not, not!

And no, this isn’t a fight I’m going to win. So how about a compromise?

Let’s agree to call the eating version of this cookie a Vanilla Snap. That’s the tasty one with a full tablespoon of vanilla, which is going to make people sit up and say, “I never thought I’d say it, but these things are capital-G Good.” The weaker versions, which are intended for use in other recipes anyway, can be called by that other name for the sake of allowing the rest of the world to save some face.

Back to your regularly scheduled programming.

Confirmed Again: “Other” Starches Work Better Than Corn Starch

Is the cookie better with a bit of gluten-free starch to supplement the flour? Yes, it is. Cake flour might work too, but we didn’t test it.

Would corn starch work? Yes… but it isn’t as reliable as rice flour, tapioca flour, arrowroot, etc., because you’ll occasionally get a less-done piece that leaves a gummy sensation in your mouth. It’s an effect we wrote about in our book Heritage Cookies of the Old and New World. Corn starch breaks down at a higher temperature than those others, and thus cookies made with corn starch are more likely to have leftover “uncooked starch” in the final product. That’s the underlying problem; it was confirmed again in these experiments; and there’s simply no reason to fight the science. Vanilla Snaps cook until the bottoms brown, which gives a margin of error, but why make use of that margin if you don’t have to?

We usually bake with tapioca starch because it is cheap and readily available in large quantities at our local oriental market. We have tested rice flour and arrowroot too, and found them to be identical. We have read that potato starch fits in too. Corn starch is the only one that requires a higher baking temperature.

Would A Drop Cookie Work?

We always prefer to write up drop cookie recipes when possible, just because they’re so much easier for new people. Refrigerator slice-and-bakes come in second, followed by roll-and-cut cookies, and then by ones you pipe out. What was the best way to go for this one?

The answer depended on what we wanted to do with them. Drop cookies worked fine from the baking perspective, but I simply couldn’t get them to come out even enough to use as a consistent base for the other project. So here is my verdict:

  • If you’re after the eat-out-of-hand Vanilla Snap version, make a simple drop cookie and be done with it. You don’t need to do it that way, but you can. Kate swears that they also came out a little lighter and crispier than the rolled-and-cut version, though I couldn’t tell the difference.
  • If you’re after a cookie to use in some other role (like the base of a Chocolate Marshmallow Treat), roll them out and use a cookie cutter. These are dead consistent and thus better as an ingredient. The dough is a little on the sticky side, but works fine if you simply dust with flour as needed.
  • If you’re trying to jazz things up, add a bit of milk to thin the dough out to a batter, and then pipe out something fancy. You could even sprinkle it with a bit of sanding sugar. It ought to work with a spritz gun as well.

Bake Until The Bottoms Are Good And Tan

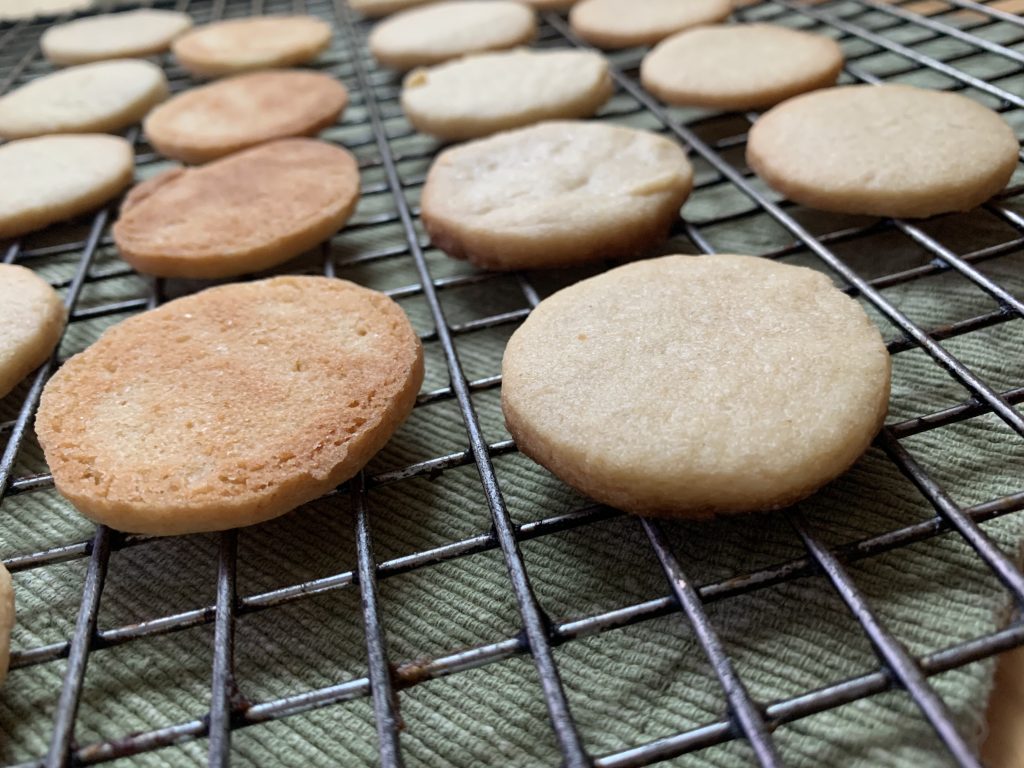
Part of the flavor in this cookie comes from actual browning on the bottom. Most cookies want to come out of the oven when they’re still pale, and the edges feel barely set. Leave these in for the full 12 minutes, or until you can see browning around the edges.

CONCLUSION

That’s about it. One forgets that plain old vanilla isn’t that plain at all. It’s a really delicious spice, and it fully deserves to be just as celebrated in a Snap Cookie of its very own. They are as “heritage” as you can get, and well worth making.