POLISH HARTSHORN COOKIES (“AMONIACZKI”), An Edible Hug

Hartshorn (baker’s ammonia) creates a crisp, sugary crust around a pillowy heart

Click here if you only want the recipe without the discussion

Hartshorn a/k/a baker’s ammonia a/k/a ammonium carbonate a/k/a smelling salts is an old frenemy we recently studied in more detail. This was the chemical leavening agent from antiquity through medieval times and on into the 19th century, when it got replaced in most recipes by baking soda and powder. Why? Because it’s also known as “smelling salts,” and smells so foul that you can’t even nibble on dough samples before they bake. Not that I would ever do such a thing, but rumor has reached my ears… [Ahem]. The smell disappears during baking, but still. Who wants a product like that in their pantry where a spill can make your cat box seem friendly?

NOTE FROM KATE: You will only taste-test this dough once. At which point you will also spit the dough into the sink and reach for a glass of water. Yuck! The baked cookies, though, are as lovely and welcoming as they are versatile. Even better, they hold a basic shape and provide a lily-white canvas for any decorating ambitions.

In today’s age hartshorn has become a specialty leavener. And yet it is still around because it produces a different kind of rise than baking soda/powder; a lighter, crispier, more even texture that’s essential to recipes like Springerle, Swedish Drömmar, fine-featured molded gingerbreads, and texture-first specialties like Hungarian Kvircedli and Ammonia Crackers. Hartshorn has its flaws, but the upside can be spectacular.
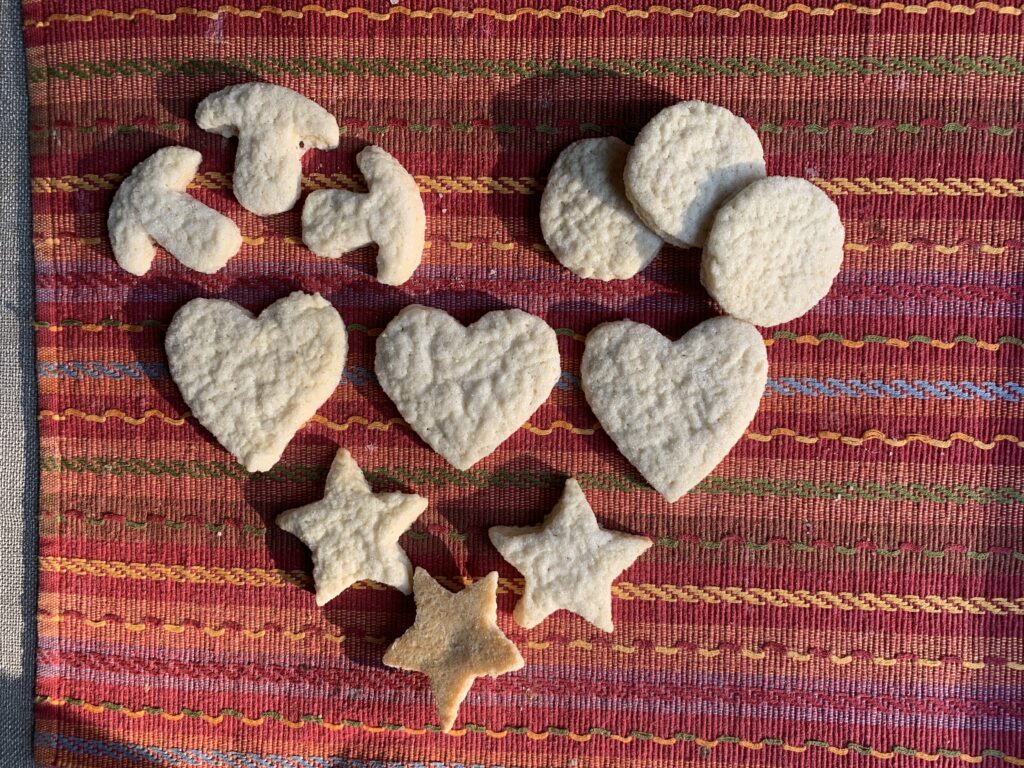
Enter this cookie: Polish Ammonia Cookies (“Ciasteczka Amoniaczki”), which I hereby rechristen as Vanilla Puffs to reflect the remarkable effect of their magic ingredient. Plus variations like Peppermint Puffs, Anise Puffs, Lemon Puffs, etc. “Puffs” being the key word because that’s the closest I can come to describing the texture: a shatteringly crisp, sugary crust around an inside so pillowy and puffy that they have a universal appeal. Most cookies will have a few, recalcitrant protesters who just don’t get it. Everybody likes Ammonia Cookies. They may only be your third-favorite on the tray, but I can 100% guarantee they’ll be gone at least as fast as the ones you would choose for yourself.

Try this cookie and you will never again wonder why serious bakers remain willing to put up with hartshorn’s challenges. The cost is worth the payoff.

The Dough is Rough-Puff Pastry (A Flaky Cookie) In Disguise!

Want a laugh? I went through the whole recipe testing process on these with the niggling feeling that I knew the recipe from somewhere, even though I’ve never made anything like it. The penny dropped around five minutes ago.

The niggling finally got bad enough for me to run back to Volume I for a scan of the ratio tables at the start of each chapter. And sure enough, there it was. The proportions of flour, butter, sour cream, and sugar are an all but perfect match to flaky cookies made from our Faux Puff Pastry recipe (a/k/a “rough puff”). The only real differences are the handling and the addition of a massive amount of hartshorn.

You make rough-puff dough by cutting butter into a combination of flour and a small amount of sugar, in order to achieve the “pebbly” texture of a piecrust with extra-large butter chunks. Then, instead of cutting it finer, as you would for that piecrust, you roll the dough out in a few “envelope turns” before finally rolling-and-cutting your cookie shapes. It’s a minor P.I.T.A., yes, but much easier than the major P.I.T.A. of traditional puff pastry.

This dough? Just cut the butter down to piecrust-texture in a food processor, include a generous amount of hartshorn, and presto! Something that tastes like puff pastry, and has a crispy outside, but has the pillowy interior you can only achieve with baker’s ammonia.

Peppermint trees. See the contrast of crispy crust to center puff?

The Sugar Crust

Stark white from the sugar crust, and just as good as they are pretty

There’s a pretty well established pattern for flaky cookies of all types:

  • Palmiers a/k/a Elephant Ears? Roll out some puff pastry (or other flaky-cookie dough), coat it generously with cinnamon sugar, roll it back into a tube like a jelly roll a/k/a roulade, and then slice-and-bake.
  • Dutch Krakelingen? Cut off strips of that same dough, roll in cinnamon sugar, and then shape them into pretzels before baking.
  • Rugelach? Do the jelly roll thing with a layer inside made from a fruit-and-nut filling, and then coat with cinnamon sugar before baking.
  • Goose Feet a/k/a “Gusine Tlapki”? Roll, sprinkle with spice-sugar (not necessarily cinnamon), and then cut out large circles which you fold into quarters.
  • Kolache? Roll, cut out squares, dab with fruit filling, fold up two corners, and then sprinkle with plain sugar.

Get it? Ammonia Cookies aren’t any different except you (a) can readily flavor the dough, and (b) can roll-and-cut any shape of cookie, and (c) should, not just can, coat the outside in sugar alone. The snowy, extra-crunchy outer crust is part of the experience.

We did test cinnamon sugar in case you’re wondering, and it works perfectly well, but it also standardizes the whole experience. Both Kate and I preferred these with sugar alone.

The Baking and Fumigation Times

The flaky cookies listed above typically bake at 350° F (175° C) for about 15 minutes, give or take according to thickness. Ammonia Cookies work a little better if you cook them at the same temperature for only 12-13 minutes. The shorter baking time helps to preserve that pillowy interior, whereas the flaky cookies want to emphasize their crispness.

The combination of a moist dough and a shorter baking time can cause a problem, however: a residual whiff of ammonia left over in the baked cookies, even after they cool. It usually isn’t all that strong, and it only happens about 75% of the time, but that’s still an issue you need to keep in mind.

The solution couldn’t be easier. Leave the baked cookies out for an hour or two. That should be all it takes for the dissolved ammonia gas to dissipate into the air. If they were really bad? Still simple. Wait a little longer.

Hartshorn giveth, and hartshorn taketh away.

The Cut Outs

Ammonia cookies work with almost any basic shape, but expand too much for anything with features. I tested stars, hearts, circles, a mushroom shape, fluted ovals, snowmen, and a Christmas ornament shape. Everything worked except the ornaments, snowman, and the fluted ovals. Those could still be recognized by someone who knew what they were supposed to be, but they lost the outside details that make them more than just shapes.

Anise hearts and peppermint trees. “High note” flavors show particularly well in this cookie.

Feel Free To Customize!

Do some research on cookies made with hartshorn and these basic proportions. You will quickly find several much loved variations. These include:

  • Peppermint Ammonia Cookies (add in peppermint oil), which are very popular in the American Midwest, and generally attributed to German immigrants;
  • Anise Ammonia Cookies (add in anise oil), same thing with what seems to be inspiration as much as tradition;
  • Ginger Ammonia Cookies (add in a generous amount of dried ginger), with some optional extras for those who want to try a popular Slovak variation.

We tested all of the above, and they all worked just as well as the standard vanilla version. I’ve no reason to believe other spices wouldn’t be just as good. These may be my new favorite when it comes to featuring one particular flavor.

FWIW, our 2024 Christmas tray is going to include the Peppermint version because we have nothing else even close to that flavor profile, and I may throw in a few vanilla ones too. Not that a spice version will find any protesters. Hmmm…

Can You Simply Put The Sugar In The Dough?

We tried it, and the answer is “Yes.” The cookie works fine. But we really like the showy, snowy white crust that comes from following the recipe, and it enhances that wonderful contrast between the inside and outside. The most I would actually recommend is the addition of something to show an inside flavor. Perhaps some anise seeds, or some bits of peppermint-green sugar.

Those flavored versions carry a significant odor, but who wants to eat the cookie I just sniffed and then put back on the tray?

Sour Cream? Is That Traditional?

Is it fair to answer that with a “Yes, but…?” Sour cream per se has been around for most of human history. After all, the root definition is nothing more than fermented cream. Some say it traces back to the Mongol hordes that made kumiss from mare’s milk, but I personally find that hard to believe. Not because the Mongols didn’t do just that, and helped to spread the idea. I just doubt that no one in human history came up with such an obvious idea before that. It certainly predates the arrival of Europeans in the new world.

I won’t speculate about the reasons, but research shows that sour cream has always been more common in central and Eastern Europe than over by the Atlantic. This enters into the history with the great migrations of Czechs, Poles, Slovaks, Germans, etc. into the U.S. from the mid 1800’s on. They brought sour cream with them, where it met the rising force of the Industrial Revolution and morphed.

What had been a hand crafted, fairly regional staple became an industrially produced, properly pasteurized dairy product sold in every market across the land. Dips made with sour cream became a capital-T Thing. Baked potatoes began to look naked without it. Mexicans used it every bit as much. And it became a common, if relatively minor ingredient in the baking repertoire of the North American continent. At which point it traveled back to Europe, and began to expand in the old world too.

You will note that we call this a Polish cookie (“amoniaczki”), because that seems to be ground central for where it is enjoyed in Europe, and was such a major part of the immigrant population that filled the American midwest, where this cookie centers in North America. So… did the original European version use sour cream, or was it a case of American ingenuity improving on the original, which then made its way back to Poland along with industrial production?

I cannot answer that. I can only confirm that European variants using eggs instead of sour cream are easy to find; that we tested them; and that sour cream is definitely the way to go. It just works better.

Can I use Baking Powder or Soda For Convenience?

We liked this cookie so much that I felt compelled to test this, and the answer is, “Only if you must.” Texture is major part of this cookie’s appeal. The baking powder ones looked okay, and tasted fine, but they simply weren’t the same. The almost-crispy crust diminished down to a mere sugar-crust, and the exciting fluff-honeycomb interior became a standard, soft one.

Would we make them in a pinch using baking powder or soda? Hmmm. I suppose we might. Particularly if we wanted a softer cookie with a distinctly clear peppermint or anise note. But to be honest, we would only do it as a giveaway cookie because now that we’ve had the real thing, they would be too disappointing for either of us to really enjoy.

Conclusion

This is a fun cookie. Kate got a bit old grin on her face at the first bite, and said “It tastes like a hug!” I had to agree. But it’s not a hug from your Grandma, or spouse, or parent, or child. Nor anyone else you deeply love. Those have too much emotional freight. Ammonia Cookies are a hug from that friend you’re meeting for lunch, or one of your daughter’s little playmates.

Simple, companionable, and yet somehow special at the same time – from both a baker’s perspective, and a human one. And that’s just the vanilla version. The cookie’s flexibility as a base for other and custom creations only makes it that much better.

Enjoy!

GRIBOCHKY – Eastern European Molded Mushroom Cookies

Spectacular eastern European mushroom cookies made with a stove top mold

Kate and I are avid foragers who spend a lot of time in the woods hunting for local chanterelles, morels, boletes, maitake, and other species. We do okay.

Every September the local mushroom club hosts a large foray that features a gigantic set of potluck meals supplied by the different members. What did we contribute for 2022? What do you think?

LEFT: poppy seed mushrooms. UPPER LEFT: scottish shortbread leaves. LEFT CENTER: caramel, raspberry, and butterscotch gribochky. CENTER: faux button mushroom caps. BOTTOM: roll and cut mushrooms. RIGHT: laskonky (walnut meringue) mushroom caps. UPPER RIGHT: The insane display made with structural gingerbread trees, poured sugar backdrop, Marshmallo Crispy treat landscape and gingerbread crumb dirt, and two large meringue Lepiotas (or Amanitas, as you wish). NOTE FROM KATE: Oh, definitely Lepiotas!

This article covers our experiments with Gribochky, those colorful little mushroom gems you can see scattered around the display and piled on the bright blue plate. Time permitting, we’ll do another on the other ways to create faux-mushroom illusion cookies. It takes a little fussing, but they’re great fun for baker and eater alike once you get them finished.

As always, skip to the bottom if you are only here for the recipe

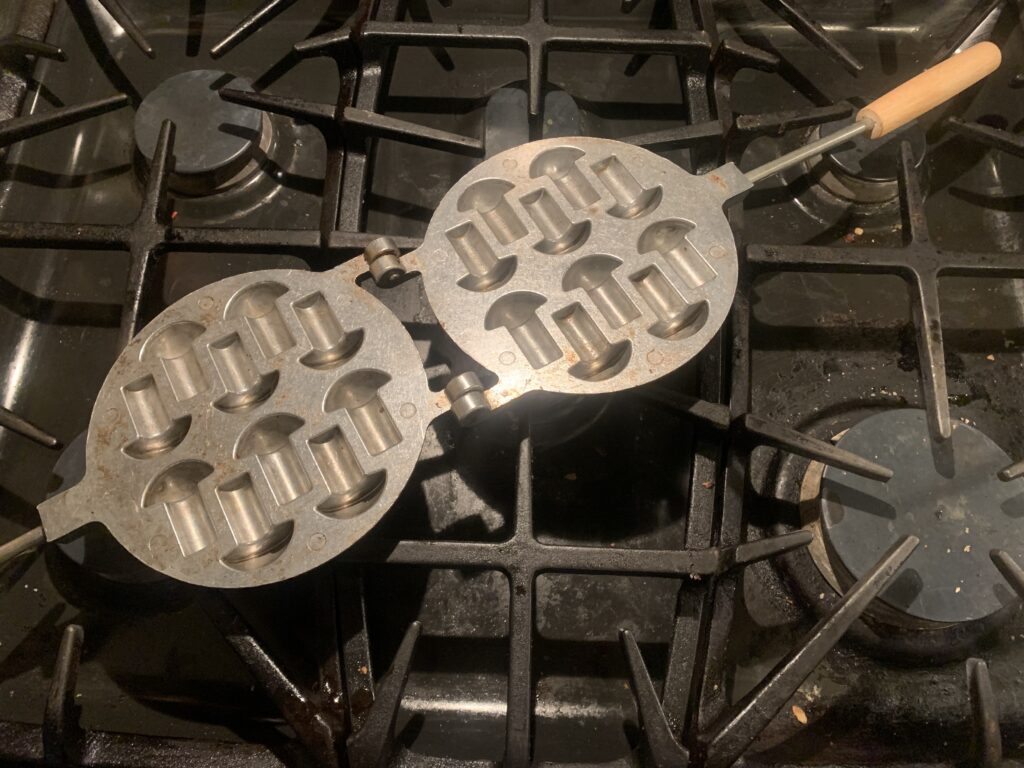
We purchased this specialty mold online. It’s the same company that made our walnut (oreshki) molds
Put a small ball of dough in each hole, close, and then cook on the stovetop until done. Both sides of course.

Gribochky is a slavic word that means “mushrooms”, just as the very similar Oreshki means “nuts.” Both are made from a dough so soft that it could even be called a super-thick batter, and both use a unique stovetop mold as shown above. But where Oreshki come out as stamped halves waiting to be filled with a rich and milky caramel, Gribochky come out as solid, 3-dimensional pieces waiting to be decorated. That’s the point when they turn special.

Amp Up The Flavor. We know at least one excellent baker who tried to make Gribochky and came away disappointed. We can’t blame her. The online recipes, which are very similar, produce a cookie so plain that it isn’t worth eating. Boooooring. We solved that by treating the base recipe as a platform rather than an end point. It worked like a charm.

We made two versions for the foray and both came out great. The first had a 1.2 oz package of freeze dried raspberries (crushed into fine dust), with an extra tablespoon or two of butter/other fat for moisture. Delicious, and a perfect way to mimic the sour tang of candy apple boletes that grow under out local oaks. The second included a tablespoon of our Pardubice honey-gingerbread spice mix. Just as good in a totally different way. And it was obvious that any comparable ‘fix’ would have worked just as well. From “yawwwwwn” to “how interesting…” in one easy step! And it’s a step you can take in any direction that suits the spices in your cabinet, the extracts in your drawer, the freeze dried fruit in your local market, and the whims in your heart.

Trust In Tradition. Many will be surprised to see sour cream or mayonnaise listed as an ingredient. Don’t be. It’s quite common in Eastern European recipes, adds tenderness, and provides a certain complicated je ne sais quoi. I may well try some Greek yogurt for our next batch.

Shorten The Flour By A Lot. Those who know us may be surprised to see such a healthy amount of cornstarch. The reason comes down to simple physics. Gribochky would be amazingly thick if treated as a regular cookie, and the gluten from pure flour would make them prohibitively tough. The starch backs that down into plain old crunchy. Yes, we usually prefer to use rice, tapioca, or potato starch. They avoid the danger of a pasty aftertaste, which can happen when you use cornstarch in flat cookies because it breaks down at a higher temperature than the others. The internal temperature of Gribochky gets high enough to remove that fear. Use whatever starch is cheap and convenient.

Cooking Time Varies. The stove top time varies with burner size, flame height, how often you flip, how often you turn, the underlying color of the dough, and probably the moods of your local household gremlin. Heck, sometimes you want a better cooked specimen, and sometimes a blonder one, so the target changes too. The only universal guidelines I can provide are these:

  • We never got the cookies done in less than 4-5 minutes (2-2½ minutes per side), and usually wanted to add a little bit of time after peeking inside to check for doneness.
  • It helps to make regular turns to change the angle, which avoids hot spots caused by an uneven flame.
  • It also helps to flip them over as they cook in order to to equalize the cooking on both sides. Look closely at the photos and you’ll see one batch that looks a little odd because I cooked them first on Side A, and then on Side B. The first side cooked more, leaving a distinct stripe. No one will notice a thing like that in the decorated cookies unless you point it out, but we knew, and so it nettled.
  • NOTE FROM KATE: I found that preheating the mold gets too heat-dangerous and fussy for me. I made as many balls as we had holes to fill, and rolled them into a conical shape. I placed the wide part of the cone into the cap of the mold in each cavity (both sides, please!) The mold was warm but not too hot, so I could use my fingers to push the dough all the way in. I closed the mold and popped it over the flame. Time it, flip it, go again, and repeat until done. The lack of preheating doesn’t hurt the cookie (you can vary the time or the flame height) and it avoids “casualties.” Also, you don’t burn your fingertips!

DECORATIONS; a/k/a TURNING ON THE MAGIC

There are four parts you can pay attention to on each cookie: (1) the cap, (2) the base, (3) the stem, and (4) the pore/gill layer. The first two matter most, but you can certainly gild the lily by playing with #’s 3 and 4 as well.

Decorating The Caps: We’ve tested two basic techniques for the cap coating. Both worked, and playing with either approach yields a vast number of options. It’s a no lose situation.

The first method centers on melted chocolate. Dark, milk, white, food-dyed-white, and even commercial candy melts – each and every one of them will work. We like to thin them out with a bit of cream, but your mileage may vary.

The best approach is to hold each piece by the stem, dip it into the coating at an angle, and then roll the cookie to cover the entire surface of the cap. Remove, let the excess drip off, and then set them cap up in a place where they can dry without flattening one part of your coating. Egg cartons worked great, with ice cube trays a very close second.

Dark chocolate, textured by accident because I melted it without any cream, cocoa butter, or other fat to make it thinner and smoother. I love the contrast created by painting the “pores” bright yellow.

We also tested chocolate chips, but they didn’t work nearly as well. Chips are carefully designed to not melt, and overcoming that is like fighting the tide. First you must add cream to help them melt evenly. Then you find that they harden, curdle, and/or to harden in inconvenient ways despite the cream. And then they’ll suddenly discolor if you try to keep them warm on the stove top. I can’t recommend chips except for something odd like butterscotch chips, which do double duty as a coating and a unique flavor addition.

NOTE FROM KATE: instead of cream, I prefer using cocoa butter melts. They help your chips or chocolate melt, loosening the mix and helping with dipping properties, but they also yield in a nice and solid surface with none of the tackiness that cream can cause. We winged it with the chips here. For exact instructions, kindly refer to our “Chocolate coverture” recipes associated with chocolate-dipped marshmallow treats.

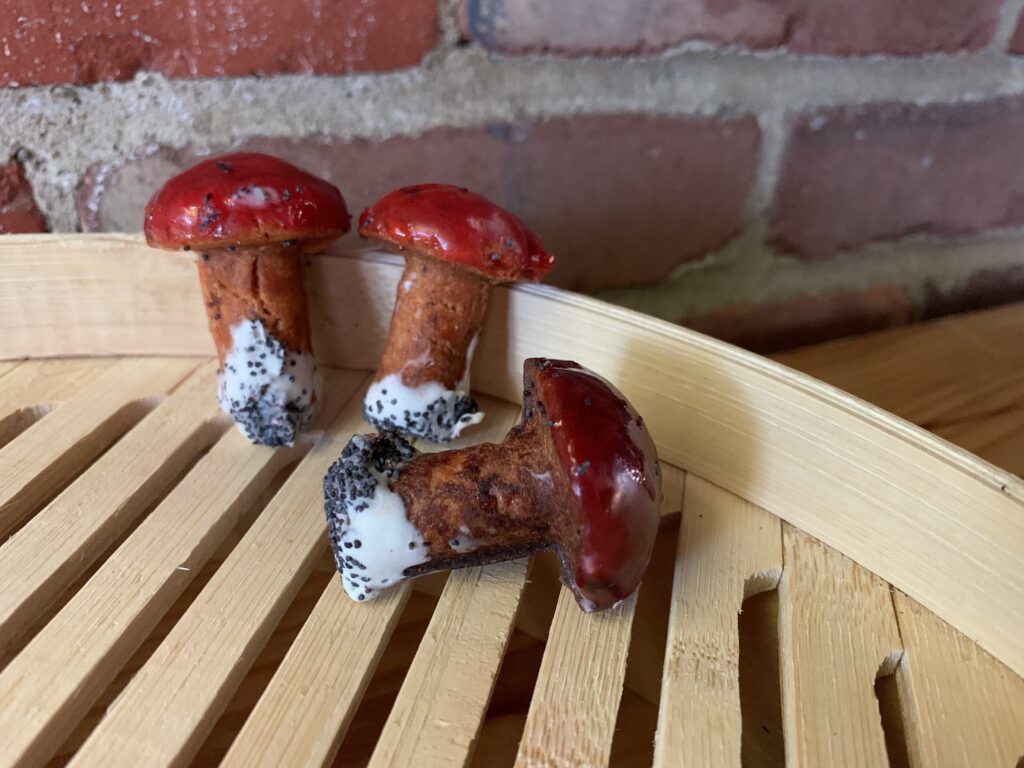
Butterscotch chips for the cap. It was a PITA but we made it work! White chocolate base, with poppy seed dirt. BTW… did you notice the stripe on the left hand cookie? That’s the one where I forgot to flip them as I cooked.
Butterscotch chips cooked into a dark caramel. Still usable and edible, but it came at the cost of frayed tempers and a few choice words that cannot be shared in public. They looked pretty good anyway, and could have been great if we had enough time and energy to paint the underside of the cap.

The other cap technique uses molten sugar. The prettiest of them all is a candy apple coating made from “hard crack” sugar syrup mixed with some bright red food dye. Your target is 300°-310° F (149°-154° C). Caramel works well for light and dark browns.

The problem here comes down to safety. 310° sugar syrup can burn you badly enough to leave obvious scars. No bueno. We came up with a workaround, but it requires three hands. Hand #1 steadies the pot. Hand #2 holds the cookie stem in a pair of tongs, dips it into the hot syrup, rolls it around to get even coverage, and then lets the excess drip back into the pot. Hand #3 then takes the cookie out of the tongs with a pair of chopsticks, inverts it, and lays it out in an ice cube tray (cap up) to dry. NOTE: The sugar is so hot and so sticky that it will melt a styrofoam egg carton, and pull off shreds of a cardboard one. Yes, the cardboard easily peels away from the cooled cookie, but better to avoid the issue in the first place. NOTE FROM KATE: peel cardboard bits off the sugar with fingers, then moisten a small brush and work the surface over a bit. When in doubt, remember that you are making the cookies healthier by incorporating an extra microdose of fiber!

The upside? Behold!

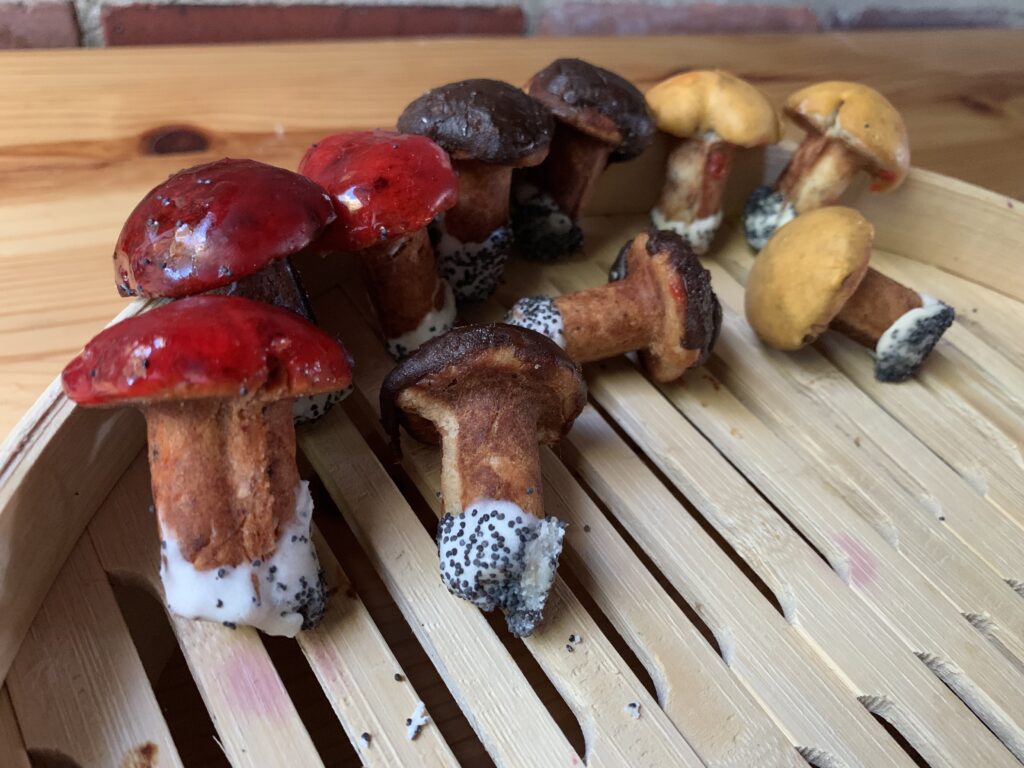
Candy Apple Gribochky
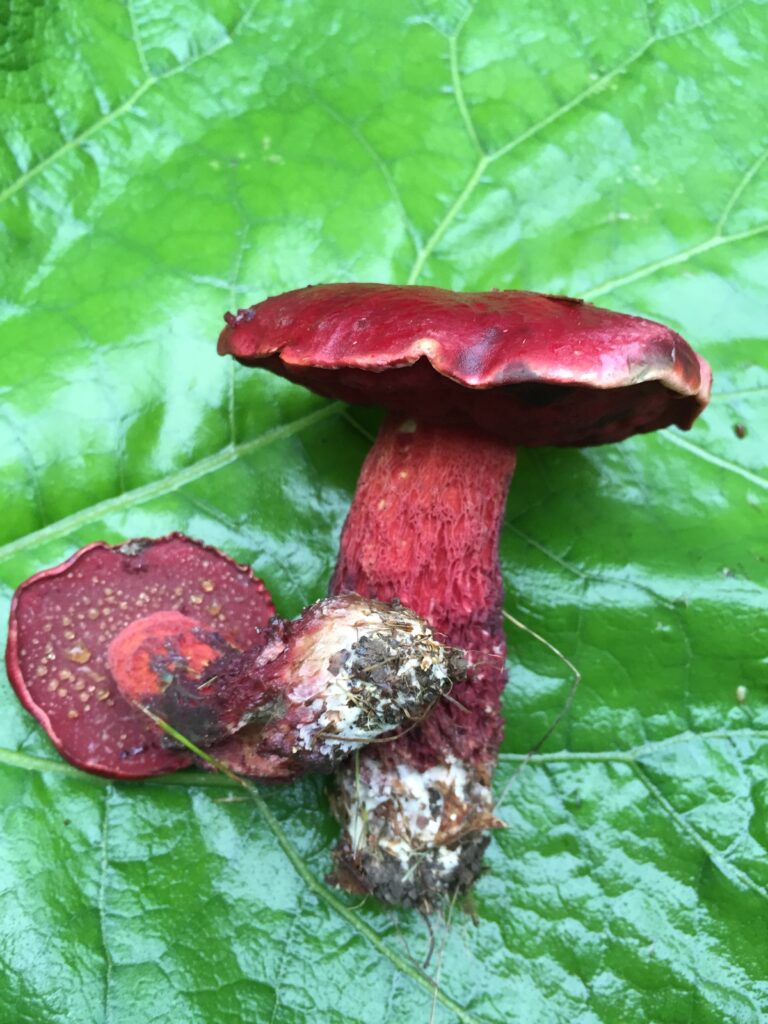
Gotcha! These aren’t cookies. They are the real life Candy Apple Bolete, Exsudoporus frostii. Nature’s pretty cool, isn’t it?

Decorating the Base: This step is easier because there aren’t many options, all of them are easy, and the shape can be handled with fingers alone. Did you know that mushrooms are actually the fruit of the fungus and not the main entity? The apple of the tree? ‘Struth! The main body is called “mycelium” and will be spread in a mat over a relatively vast area in and around the soil or the nearby wood. This is what you’re seeing at the bottom of mushrooms poked fresh out of the ground.

Mycelium is almost always some shade of white or pale yellow, and is easy to replicate with white chocolate or a tinted candy melt. Add poppy seeds or cookie crumbs for “dirt” and presto! Your illusion is complete on both top and bottom.

The Underside Of The Cap: Mushrooms with this shape will have either gills or pores on the underside of the cap. Adding this layer is a special touch that true mushroom geeks will appreciate, but it’s very hard to see unless you make it a bright, contrasting color like the yellow-on-dark specimen up above.

Gills can be any color of the rainbow, but most people will want to make them white, pink, or cocoa brown to imitate the best known species. Lilac will make the mushroom hunters happy. Mushroom pores will be white, yellow, pink, or red at this spot in the vast majority of cases, sometimes with blue or brown bruising on the surface.

Decorating the Stem. Stem features, ironically enough, are often the most useful part of a mushroom for field identification. For Gribochky? They’re an afterthought, because the features are impossibly subtle to duplicate. The only time it’s worth an effort is something along the lines of painting/dipping the stem to make it white, and that only makes sense when you’re trying to model an Amanita or Agaricus (see below). OTOH, adding berries or food dye to the actual dough can be a fantastic trick for species like the red Candy Apple Boletes. That, and cooking the Gribochky to a lighter or darker shade of brown, is almost always enough to complete a high quality illusion.

A Few Common Mushrooms To Mimic.

The so-called “toadstools” with white spots on top are in the genus Amanita. These can have caps ranging from bone white through basically any color, have white gills, almost always have a white stem with a ring of extra tissue about 2/3 of the way up.

Supermarket button mushrooms are in the genus Agaricus. They have white caps with white stems, and gills that start off pink before aging into brown. These will also have a ring on the stipe. Oh! And the answer is “yes.” Store bought mushrooms are all the same species, Agaricus bisporus. The little buttons are babies, cremini are teenagers, and portabellas are full sized grownups.

White chocolate “agaricus” with chocolate “gills.” This was our very first effort, and the illusion is as poor as any version you’ll ever made. And it doesn’t exactly suck even so, does it? Gribochky are show stoppers, plain and simple.

The pored mushrooms, a/k/a boletes, are my personal specialty and it pains me intensely to mention some but not others. You can find a list of every North American species at The Bolete Filter, written by yours truly under a different hat. The true “porcini,” a/k/a Boletus edulis and its close cousins, will have a yellow, orange, light red, or light brown cap with a white or yellow pore surface.

CONCLUSION

Gribochky are a perfectly acceptable eating cookie once you kick up the flavor with berries or spices, in the same way as Vanilla Snaps and the like, but their real glory lies in the illusion. There are other techniques one can use to create the illusion of a mushroom out of different kinds of cookies. They work too, particularly as part of a scene. But none allow for this level of absurd creativity, let alone the chance to customize things toward a copy of real life species. Fun, fun, fun!

Yes, the cookies require a special mold, and can definitely qualify as “fussy” on the decorations side if you try to copy real life. But the results can be shockingly beautiful, especially if you take the relatively easy step of dipping the bottom to mimic the mycelium, and then adding in poppy seeds or cookie crumbs to mimic the dirt. They start at “Cool!” and work their way up to “Spectacular.”

If pure, visual fun is your thing – or mushrooms! – this is a cookie that needs to be in your repertoire.

Raspberry candy apple, dark caramel-spice, and butterscotch-spice Gribochky