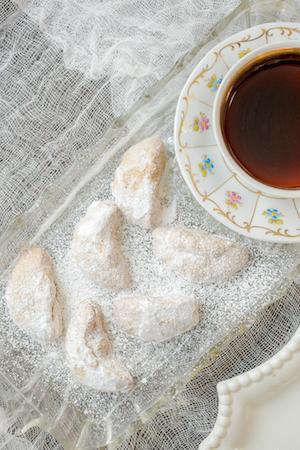
NUT HORNS (a/k/a Kipferl a/k/a Hornchen a/k/a Mexican Wedding Cookies, Russian Wedding Cookies, Italian Wedding Cookies, Greek Kourambiedes, etc.)

This is a sample drawn directly from our book Heritage Cookies of the Old and New World. The first part is our favorate “Cookie Nerd Moment” of the entire tome. This is where we stop and take the time to discuss particular tricks, tips, and historical bits that provide a lot of the “why” behind the recipe’s “what.”

You can skip to the bottom if you really want only the recipe, but this is one case where I need to recommend the full read even if you know what you’re doing. The refresher course on Tips and Tricks never loses its value.

Enjoy,

Scott Pavelle

COOKIE NERD MOMENT

Anyone who makes 20 or 30 different cookies each Christmas gets used to two common questions: “What are your favorite cookies” and “What is the favorite cookie in general?” There is no answer. Everyone has his or her own favorite and there isn’t a single cookie that would touch the 10% mark if we kept track of who voted for what.

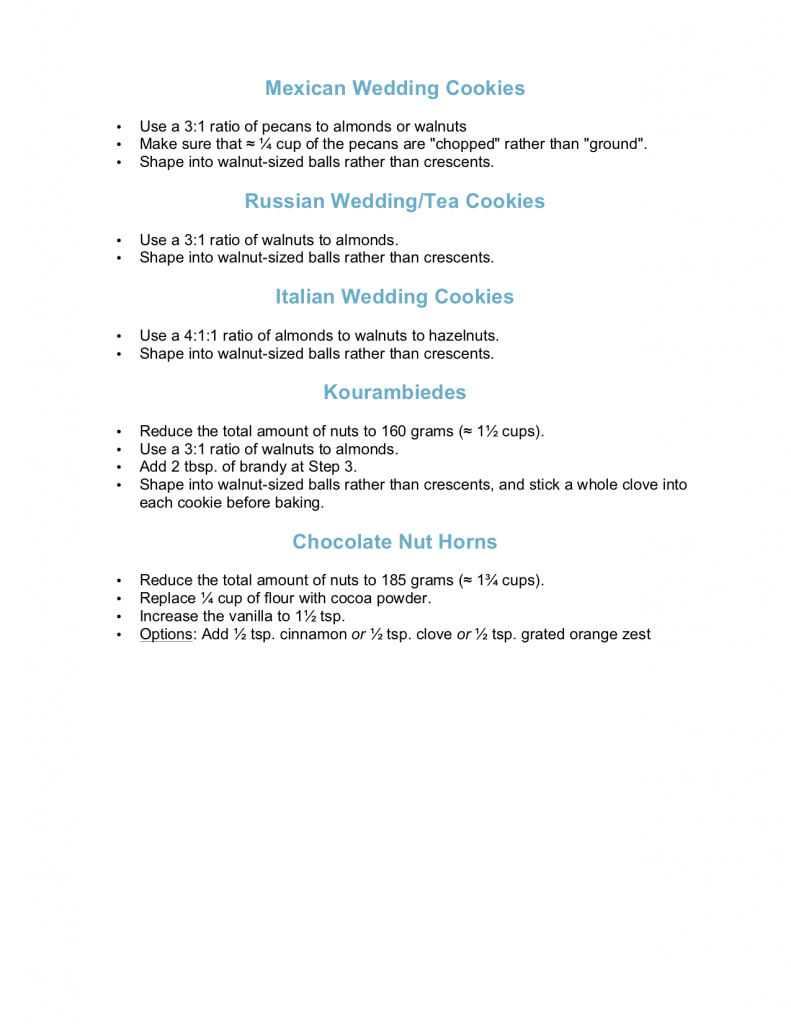
You probably could have guessed those two if you’d given it a bit of thought. But the third most common question might surprise you: “Do you know how to make [Nut Horns]?” We put that in brackets because the same basic cookie is loved with fervor and devotion across a huge part of the world with very minor changes. In Central Europe the cookie’s known by some word that translates as either Nut Horns or Nut Crescents (Kipferl in Austria and Hörnchen in Germany are two examples). Eastern European bakers shape them into balls, often with a heavier percentage of walnuts, and call them Russian Tea- or Wedding Cookies. Move south and west and the name turns into Italian Wedding Cookies, also ball shaped but with a tilt toward almonds. The south and east features ball-shaped Greek Kourambiedes, which have slightly fewer nuts but include some brandy. The New World knows them best as Mexican Wedding Cookies, which usually feature pecans. We could go on.
Simplicity plays a big part in the cookie’s charm. It’s all about the nuts, with vanilla to heighten their impact. Powdered sugar goes on top – a heavy coat that may also have a hit of vanilla. The Greeks stand out by adding a single whole clove for decoration.

There’s also a common structural theme: you’re after a cookie so tender that it will shatter to fragments at the slightest excuse, and will dissolve in your mouth with a burst of buttery, nutty goodness. That’s the hard part – getting them just tough enough to wait for an excuse without losing that meltiness.

We spent many years fidgeting and playing with this recipe to get it just right. The final product incorporates a number of subtle tricks that will add up to make the best [Nut Horns] you’ve ever eaten. Better even than Grandma’s!

  • TRICK #1 (for flavor): Toast the nuts in advance. It gives you a longer, deeper flavor.
  • TRICK #2 (for texture): The textures from your nuts matter as much as the flavors. We strongly prefer to mix that texture up to give the full experience from meltingly soft in most parts to recognizable bits sprinkled here and there. We always start by using a rotary grater to reduce at least half the nuts to a point just short of where you’d start calling them “nut flour.” Maybe even a little short of “nut meal.” The other half should be a mix of textures ranging from “finely ground” to “finely chopped”. If push comes to shove we suggest a 50/50 mix of nut flour for the first half and ground nuts for the second. Grandma may have ground all the nuts for convenience but even she would agree that mixing the textures adds something extra.
  • TRICK #3 (for flavor and texture): We also favor a mix of nuts. This particular trick may cause Grandma to start muttering about upstarts and heretics when you mention it, but trust us: a little hint of walnut will make your pecans taste more “pecany”, just as some almond and hazelnuts will make your walnuts more “walnutty.”
  • TRICK #4 (for flavor): A hefty pinch of salt also enhances the nut flavors. Just make sure to use so little that no one can tell it’s there.
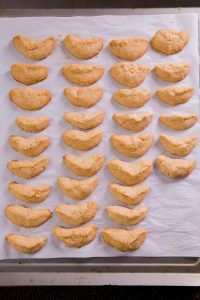
  • TRICKS #5.a to 5.c (to counter fragility): Our recipe hovers right on the edge of falling apart into a 50% casualty rate from being too tender. There are several tricks and options designed to pull it back from that horizon. You’re going to need at least one of them:
    • A spoonful of water in the flour adds just enough gluten to hold it together. This trick doubles as a way to customize for your particular kitchen and flour.
    • An egg yolk in the dough works too and is more traditional, but can make the cookies caky if it goes too far. This was the “cheat” that Grandma used in secret because her best friend, the one she wanted to bake like, didn’t need to.
    • Working the dough as you form the crescents can also add a little gluten, but it comes with a real warning: the heat of your hands can melt the butter in your dough, which turns the cookies oily and guarantees they’ll be too tender.
  • TRICKS #6.a to 6.c (to counter toughness): Our recipe uses so many nuts that fragility tends to be the bigger problem, but sometimes you have to go the opposite way. We ran into this when we lived in Boston and used the high protein King Arthur as our house default. Here are some techniques that will add tenderness without changing the basic formula:
    • Remove any extra water or flour from your dough.
    • Refrigerate the cookies on their tray for 30 minutes before baking. This will relax any built-up gluten.
    • Remove a tablespoon of flour from the recipe.
  • TRICK #7 (for flavor): It’s a little counterintuitive but this particular cookie actually tastes better if you narrow the “horns” of your crescents toward the ends. Yes, the easiest way to make a crescent is to form the dough into a rope and then bend it in the middle. Yes, that is a typical way to ensure even baking by creating an even thickness. Yes, you can even treat this as a roll-and-cut cookie with fine results. But this isn’t a typical cookie. Having some parts toastier and others tenderer will only add to the sense that you’re eating something made from [nuts!!!].
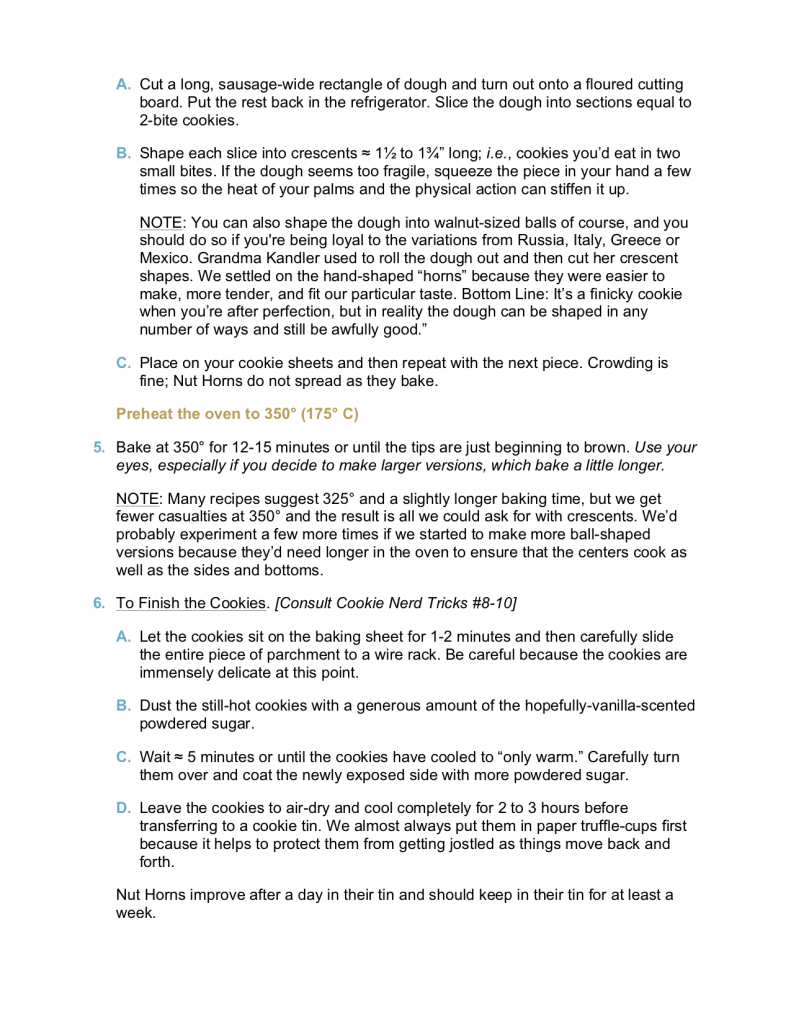
  • TRICK #8 (the post-oven danger zone): You must cool these cookies on the tray until they are only warm. They are ridiculously fragile when hot from the oven and will fall apart if you even stare too hard.
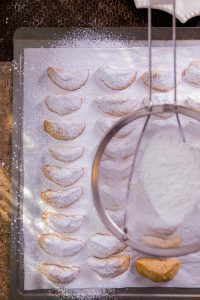
  • TRICK #9 (for a final touch): We aren’t big believers in fancy chancy “touches” like scenting the powdered sugar for a few days with a more-expensive-than-gold vanilla bean bought for the purpose. This is the one recipe where we sometimes make an exception. Not always… but sometimes. There’s something about the wafting smell of vanilla that seems to stimulate a person’s specialized nut detector taste buds. [What, you never heard of those? Try a proper Nut Horn and you’ll see the proof for yourself!]
  • TRICK #10 (coating with enough powdered sugar): Warm cookies are fragile cookies, but nevertheless you must coat them with the powdered sugar while they are warm because the outgassing steam helps the sugar to stick. Kate likes to move the whole sheet of parchment onto a cooling rack, dust them there, wait 5 minutes, and then turn them over to dust what had been the bottoms.
MANDELHORNCHEN a/k/a “Almond Horns”

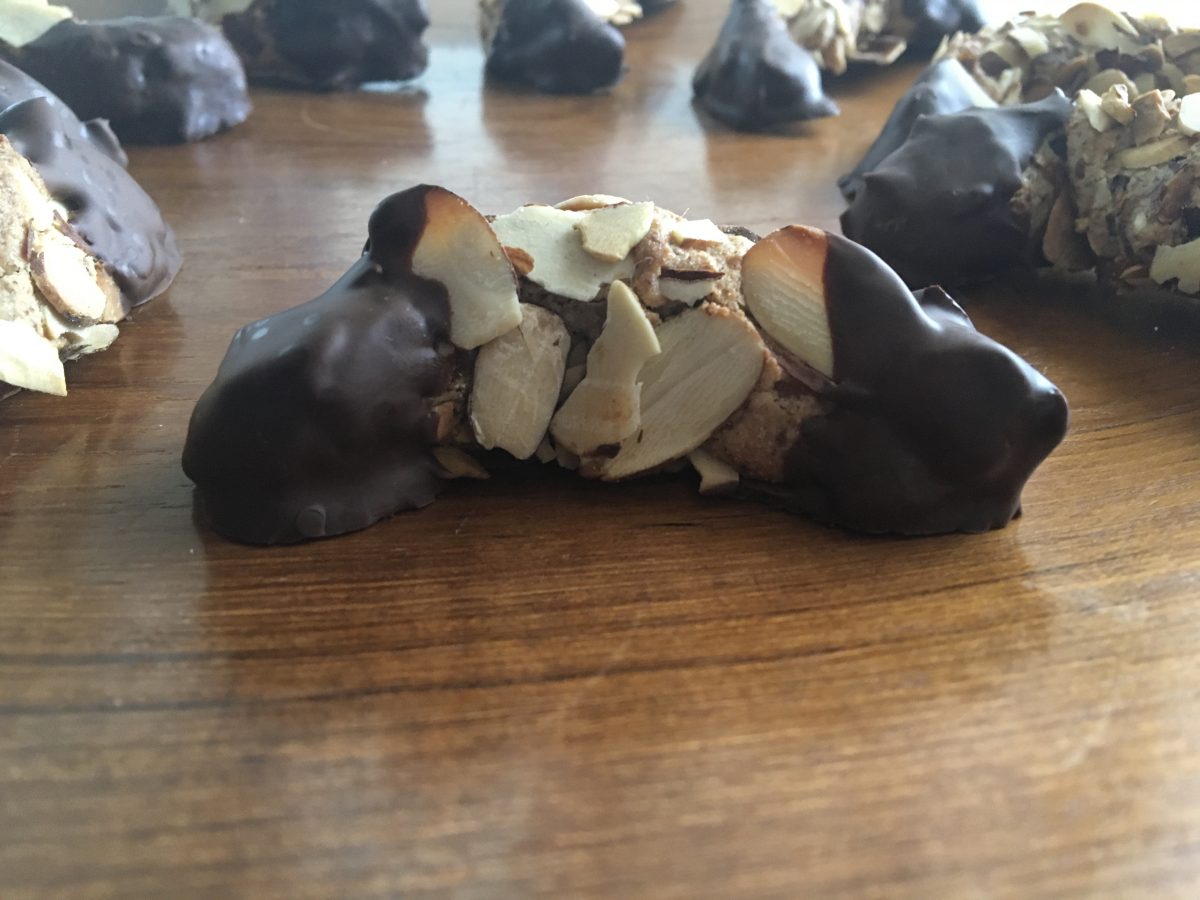
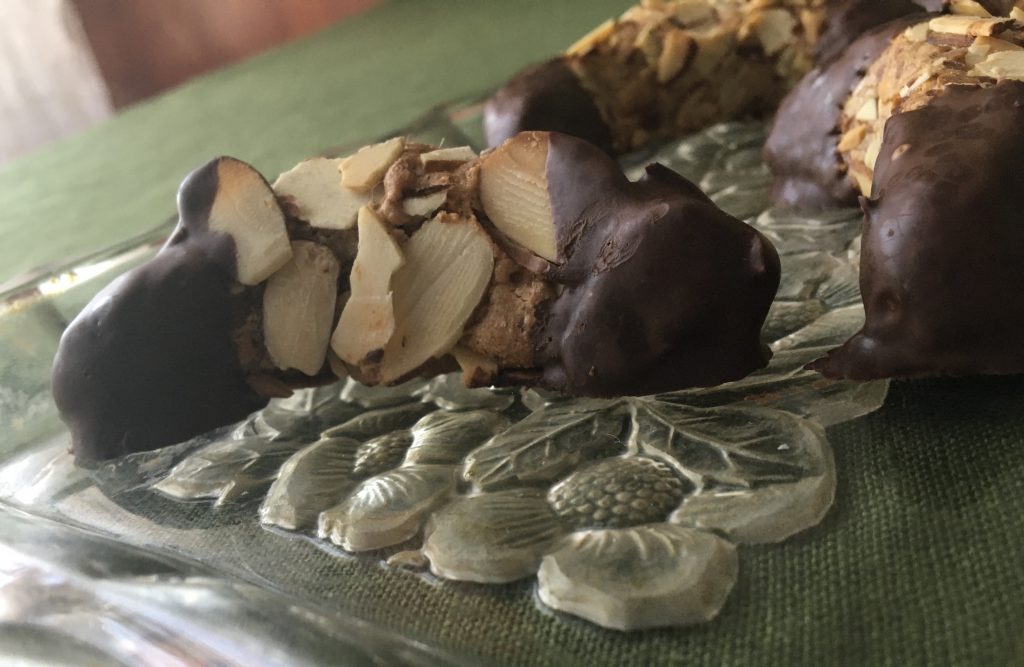
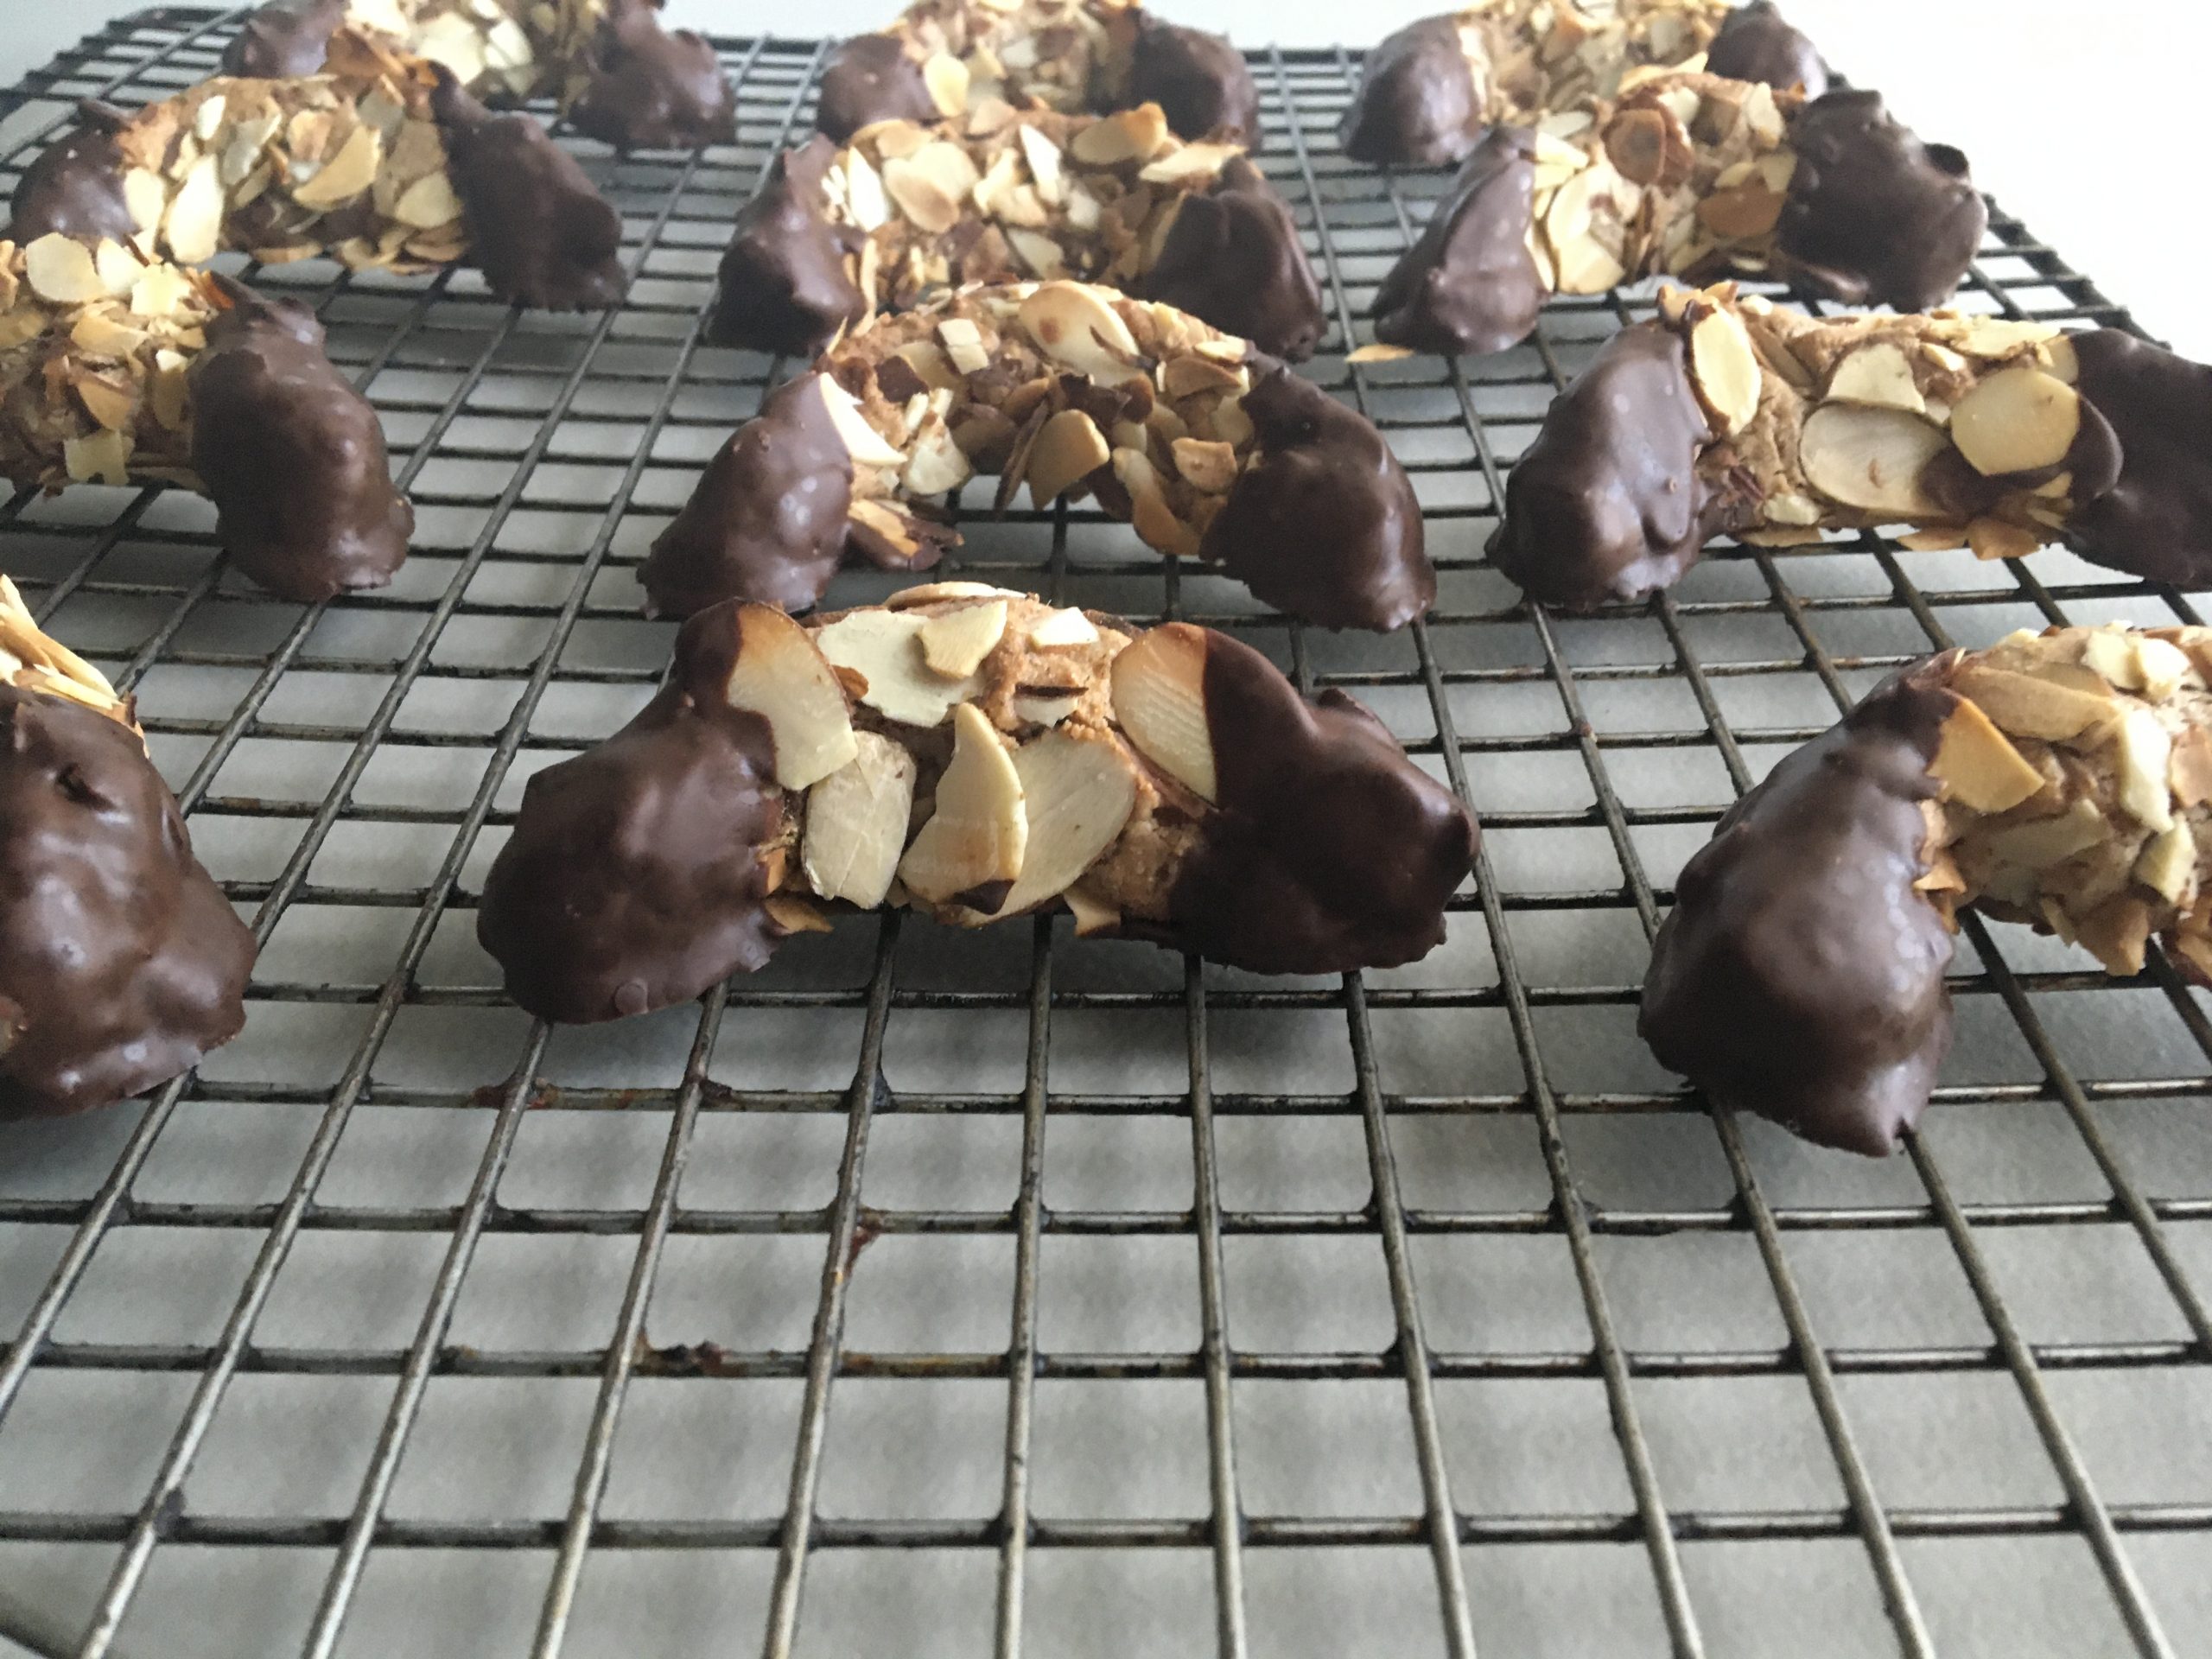
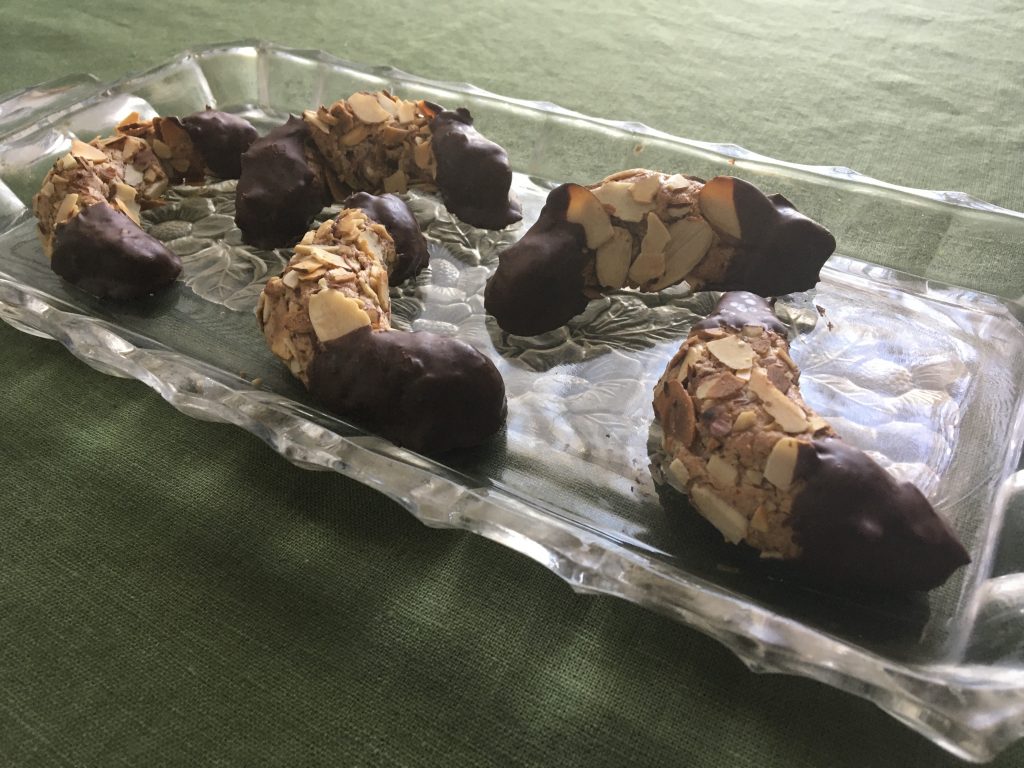
Here’s a recipe that many readers will know because they’re very popular at certain upscale supermarkets. They have a lot going for them, starting with a very pure hit of almond and chocolate (two flavors that love each other), and continuing through the fact that they’re naturally gluten- and dairy-free, which suits a lot of people with allergy problems. They’re also very generous and fairly dense, which means that anyone who’s willing to eat baked goods for breakfast can get by with 2-3 “cookies” and a nice cup of Joe. (A meal that Scott has admittedly enjoyed as he writes this article).

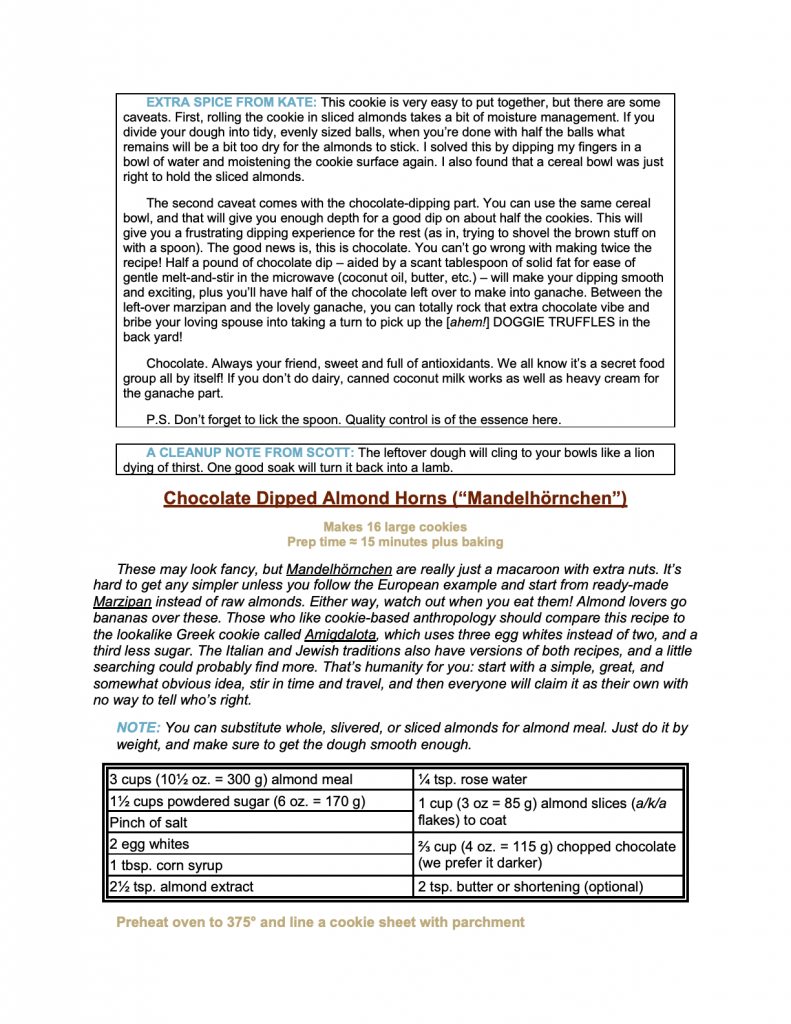
The other benefit? Almond Horns are incredibly easy to make. The basic recipe couldn’t be simpler: (1) put everything in a food processor; (2) grind until it’s smooth and begins to ball up; (3) roll each piece in almond flakes; (4) bake; and (5) coat the horns or bottom with chocolate. The issues come up with the little details that avoid problems in each of those steps.

As always, please skip to the bottom if you are only here for the recipe.

 Step 1 – Choices About Ingredients

Classic European recipes typically start from Marzipan rather than working from scratch. Take Marzipan, blend with egg white(s) to loosen it up, and you’re basically there. Convenience cookies!

Marzipan isn’t as common in the U.S., costs more, and the different brands vary in their dedication to the cult of sugar and the abuse of almond extract. We’re also a nation of people who take food processors for granted. That tool converts Marzipan from a painstaking process into a walk in the park. If cooking from scratch is cheaper, just as easy, more reliable, easier to customize, and lets you use a little less sugar… well, cook from scratch.

We recommend that you start from almond meal because it’s become easy to obtain and ensures an even result. In the ideal world you’d start from whole or slivered almonds, toast them to enhance the natural flavor, and then reduce that to meal during the grinding stage. It’s really up to you. But from one obsessive purist to another? We just get the almond meal. There’s so much extract that the toasted flavors get lost anyway.

Step 2 – Grind It All Together

No kidding. That’s all you do. Put everything in the machine except your coatings (toasted almond flakes and chocolate). Process, scraping down the sides from time to time, until it comes together into a smooth dough that balls up around the blade. Done.

That couldn’t be any easier, but there are a couple of tricks because the dough changes with (a) your kitchen’s level of humidity, and (b) whether your Size Large egg whites are closer to mediums or closer to XL’s. They do vary within each range you know. It isn’t a problem if you keep the target in mind: “Dough that is just sticky enough to hold on to toasted almond flakes.” Too sticky and it will be hard to work with. Not sticky enough, and your coating will fall off.

  • If the mixture seems too dry, add in a tablespoon or two of water. This happens every time in a Pittsburgh winter, and almost never in our summers.
  • If the mixture seems too sticky, add a tablespoon or two of extra almond meal. Extra sugar works too.

For what it’s worth, we actually get a kick out of these little customizing steps. They make you feel like a Real Expert who knows the secret cheat codes.

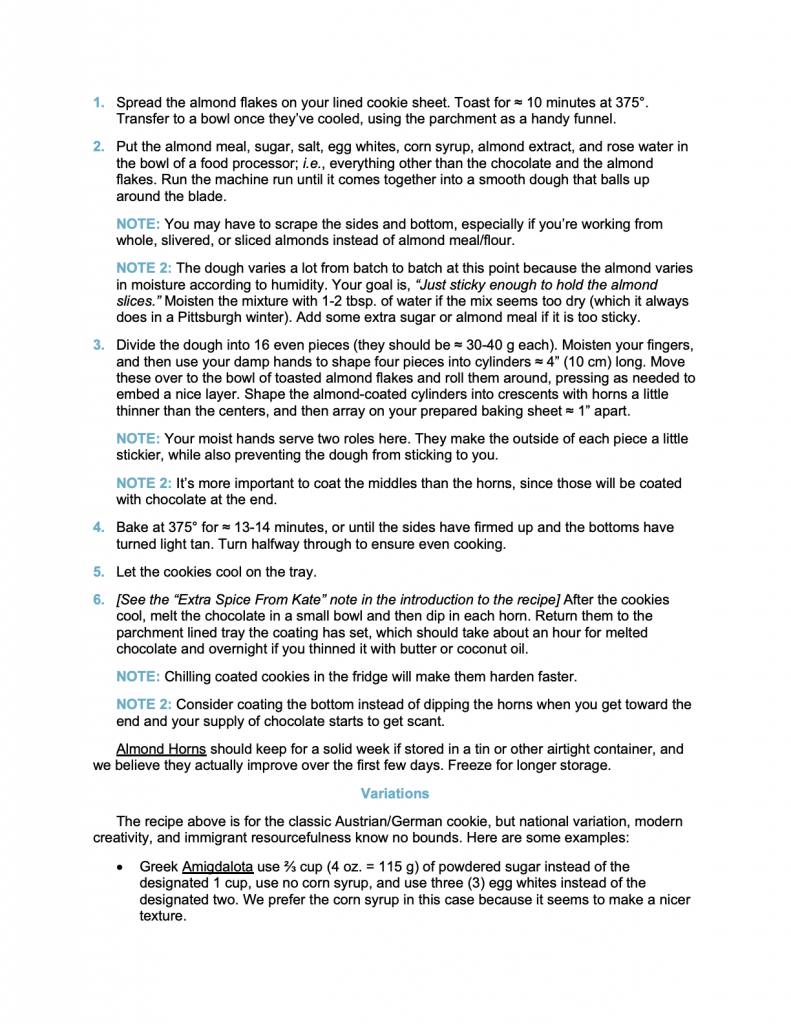
Step 3 – Form the Cookies

A few of those secret codes make this step just as easy.

  • First, remember that most people make these into large, 4-5 bite treats. One recipe makes enough for 16.

That’s not a coincidental number because you get there by cutting the dough in half, then each half in half four more times. If you want smaller cookies, cut the initial piece into thirds and then proceed to halve them over and over. This will get you to 24.

  • Second, moisten your fingers and palms before you form each cookie. That will keep the dough from sticking to your hands, and also make the surface extra sticky for holding on to the almond flakes.

Better for you, and better for the cookies. You’ll need to wet your hands several times before all the pieces are done.

  • Third, form each dough piece into a short, fat sausage as thick as you want the middle of your cookie to be. Roll this cylinder in the toasted almond flakes, and then pinch/curve the ends to form your crescents.

Cylinders are much easier to work with at the rolling stage, and you do not need as many almonds on the ends anyway because they will get coated in chocolate. Yes, you can just make a longer, thinner sausage, roll that, and bend it into a “C”. And yes, it is a little easier. We prefer the result from crescents; they have a texture that changes as you nibble through each treat.

Step 4 – Bake

375° is just hot enough to get a few of the almond edges extra toasty. A nice touch. As always, you want to pay more attention to the aroma and texture than the actual time. They are done when the sides firm up and the bottoms have turned light tan. It’s taken a consistent 13-14 minutes during winter testing in Pittsburgh with our oven. Please let us know if your results vary.

We also encourage you to spin these trays halfway through to ensure even cooking. We usually don’t bother with that step unless we’re dealing with wafers, but for some reason this particular cookie has been sensitive to hot spots.

Step 5 – Coat The Ends With Chocolate

This is the one step in the recipe that creates some frustration. It comes from two problems. First, the chocolate will harden as you work. And second, you won’t have enough chocolate in your bowl to dip the ends when you get to the final few pieces.

You can solve the chocolate problem by either keeping it warm, or mixing in a small amount of fat. Scott prefers to use plain chocolate, and to keep zapping it in the microwave for very short bursts as needed. Kate, who did most of the chocolate work, suggests adulteration – with the proviso that you must use a fat hardens at room temperature. Coconut oil works but can add some flavor. Palm oil has the perfect characteristics but is evil. She recommends butter or shortening, whisked into carefully melted chocolate. The resulting chocolate dip can be extra sticky at room temperature and takes a while to harden, but it is easy to work with. Your mileage may vary.

The problem of what to do toward the end takes more thought, and there is no really good answer. If you want the chocolate supply to end on the final cookie, you won’t have a deep enough pool to actually dip the horns of the last two pieces. Careful work with a spoon can help, but it only goes so far. Either you need to make/waste extra chocolate dip, or you need a cheat code.

Scott offers this workaround: Don’t try to dip the horns on your final piece. Coat the entire bottom with your leftover chocolate instead. It creates a more uniform treat that’s a little less intriguing to look at, and has less contrast when you eat it, but it does have the benefit of giving every bite a little bit of chocolate. Brush all the bottoms with chocolate if you want every piece to be the same.

Kate rolls her eyes at that, and says you should simply make enough chocolate to do the dipping and be done with it. Leftover chocolate makes a wonderful ganache for truffles, or at worst a special treat for the first lucky passerby who can find a spoon. You, of course, are a mature, fully grown person with the control to inflict those treats on someone else.

Cool and Consume – The End… Until Next Time

Mandelhörnchen are one of those treats that become a baker’s signature offering to guests, grandchildren, and drama club bake sales alike. They’re so very big! Physically, in taste, in texture, and in ways that combine to be more than the sum of their parts. They also show off familiar flavors, and they taste exactly like people think they will, except more so. There’s a huge bang for the buck factor.

Plus they’re fun and easy to make once you internalize those little tricks: keep your hands moist when shaping, and accept that there’s only so much chocolate to go around.

This is a marvelous recipe that you’re really going to treasure. We Promise. Enjoy!

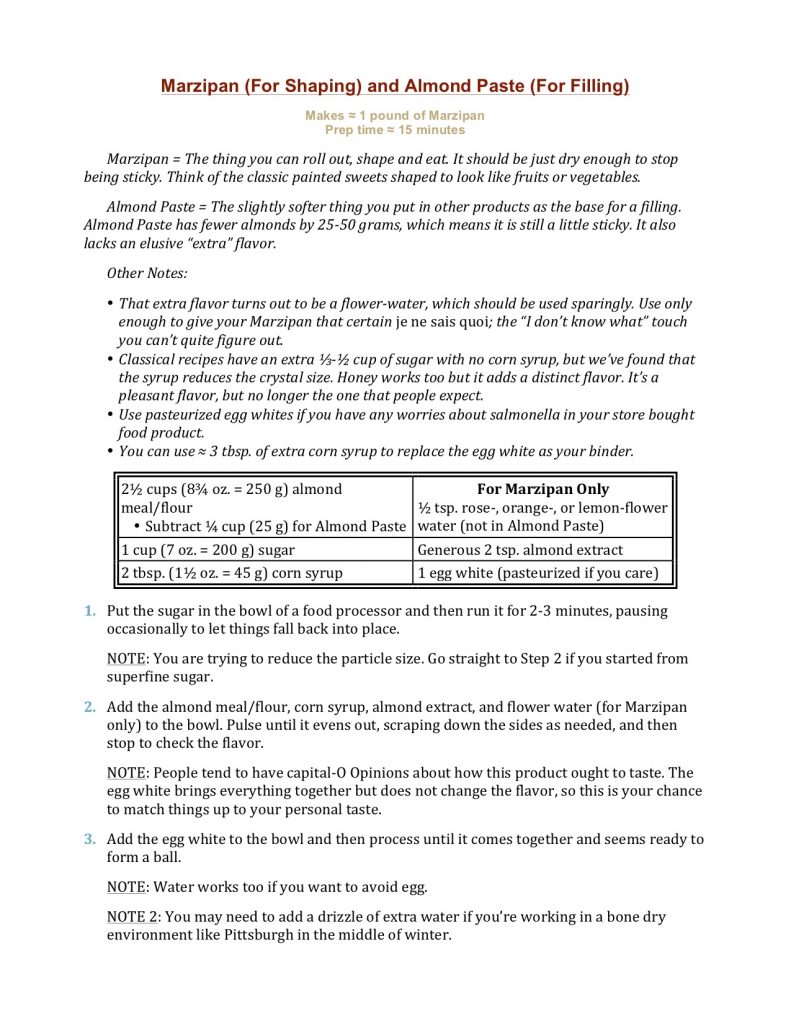
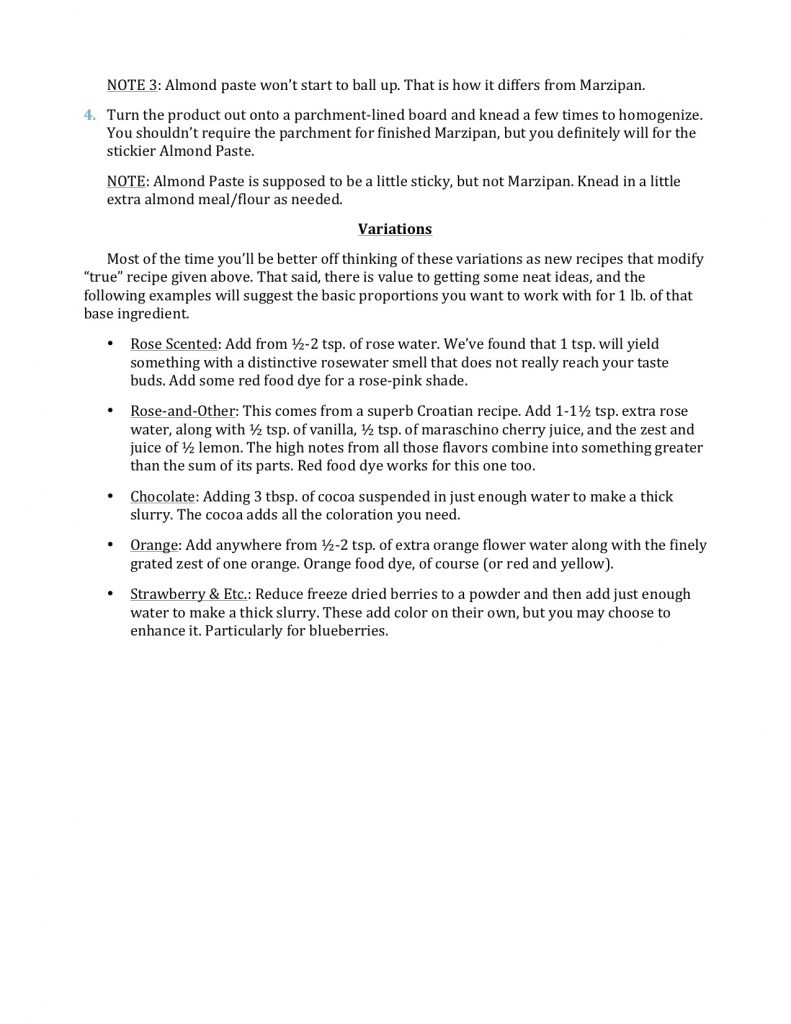
MARZIPAN & ALMOND PASTE – the recipe beneath the recipes

A few weeks ago we put up recipes for a set of Five macaroon recipes we’ve come to love – which could be described as marzipan suspended in an egg white meringue. And I am now working busily on a special Croatian treat called “Rafioli”, which is basically an exotically flavored almond paste wrapped inside a baked pasta shell. [Watch for it!]

German Mandelhörnchen and a Greek equivalent are also on our “to do” list after Kate took an initial whack that wasn’t too far from being right. Those amount to a flavored marzipan or almond paste lightened with fewer egg whites than you’d use for macaroons, formed into crescents, and then dipped in chocolate.

EXTRA SPICE FROM KATE: We have no photos of the Mandelhörnchen because a mysterious cookie gremlin raided our kitchen before anyone could add the chocolate part. Skeptical spouses have wondered if “doppelganger” would be a more accurate than “gremlin,” but I admit nothing. He only suggests such an outrageous thing because they are one of my all time favorites, both tasty and toothsome.

And then… Hmm, a pattern seems to have formed! There are dozens, if not hundreds of baked goods that start with a base of finely ground almonds, mixed with sugar and then bound by egg whites. That ingredient is called “Almond Paste” when left loose and a little sticky, or “Marzipan” when you add enough extra almonds to make it solid. We wouldn’t call either one a “cookie” all on its own. Commercial marzipan is actually marketed more like a not-so-sweet candy (with U.S. and English versions tending to be sweeter), and almond paste as an ingredient. But the basic concept gets used in so many true cookies, and cookie fillings, that it’s only fair to give our version.

Besides, Valentines Day is coming next month and you can earn some major brownie points by making Marzipan treats and forming them into something romantic. And double-besides, the recipe for Marzipan contains a couple of surprises that many people don’t know about, such as a tiny bit of rosewater used as everyone’s not-so-secret ingredient.

Anyway, here is our version for your education, edification, and delight.

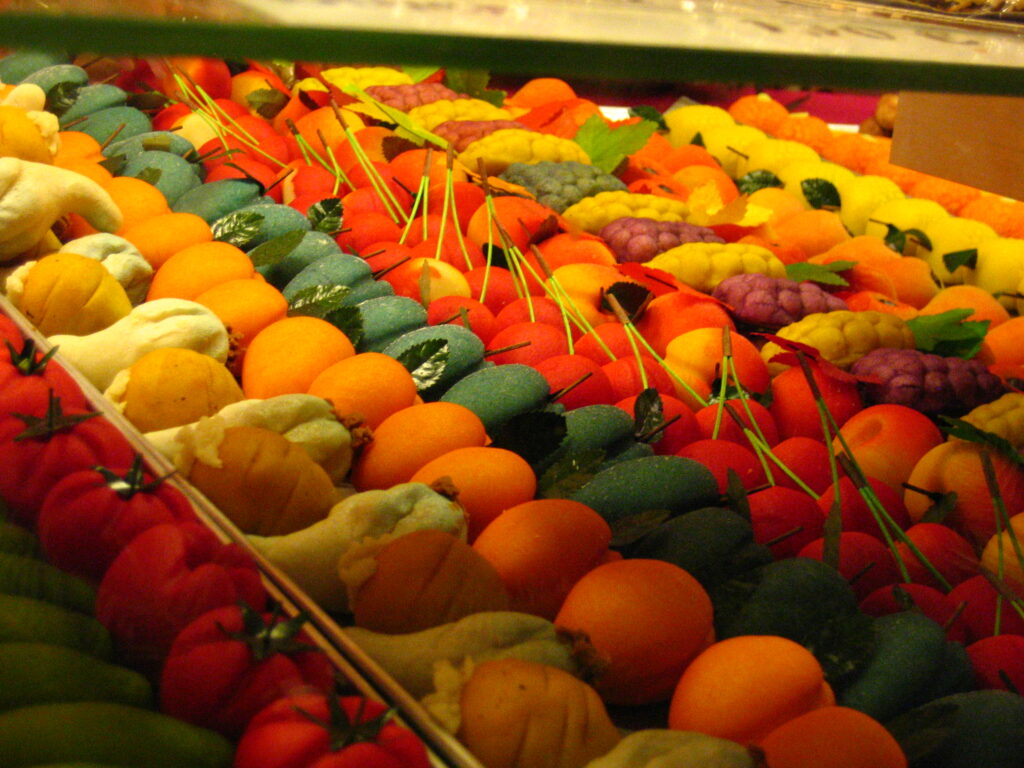
This lovely photo of Marzipan Fruits at the Nuremberg Christmas Market is available under a Creative Commons Attribution-Share alike 2.0 Generic license at the linked website. Many thanks to the author for his or her generosity.

FIVE (5!) MACAROONS – Renaissance recipes for the modern world

It’s hard to get more “heritage” than the early Renaissance, and that’s what we have here: four famous cookies that grew into maturity along with the likes of Leonardo, Michelangelo, Donatello, Botticelli (with whom Leonardo supposedly founded a restaurant), Verrocchio, Raphael, and the rest of them. And Columbus for that matter. What can inspire artistic brilliance more than a really good cookie? The answer is obvious: Nothing!

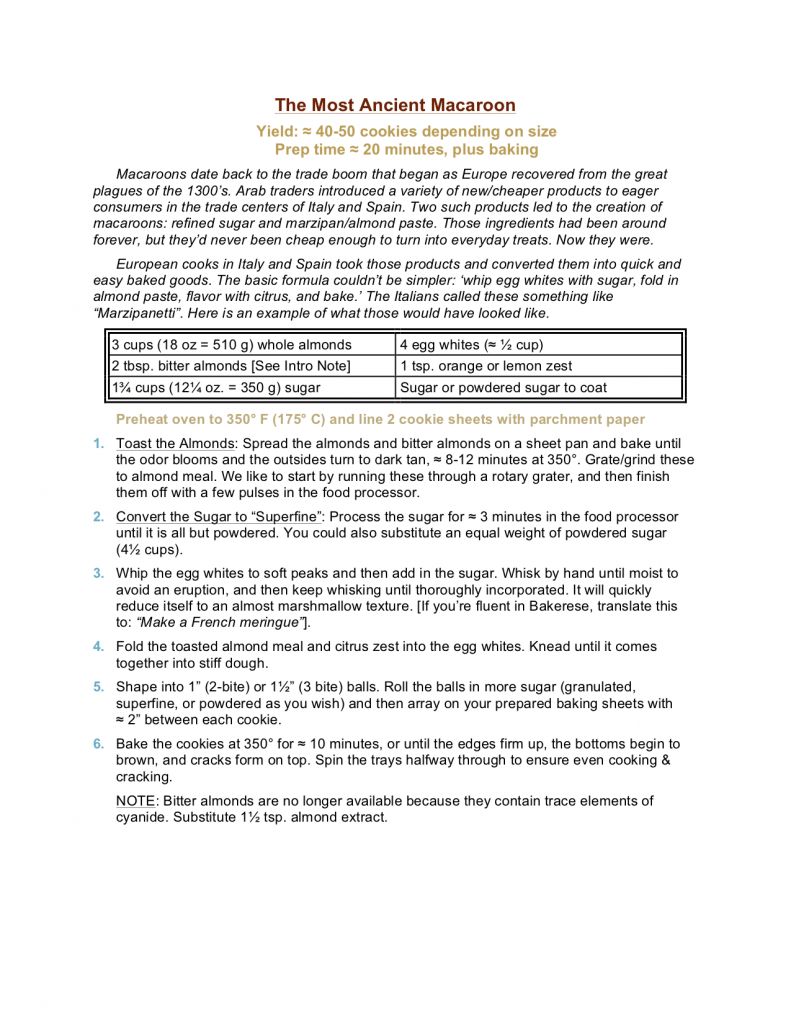
We’re talking about classic macaroons, a cookie dating back to the trade boom that followed the Black Death’s destruction of medieval civilization. Arab traders introduced a variety of products to eager consumers in the trade centers of Italy and Spain. Two main ones in turn led to the creation of macaroons: refined sugar and marzipan a/k/a almond paste. Yes, those ingredients had been around forever, but they’d never been cheap enough to turn into everyday treats. Now they suddenly were, and Renaissance Europe was ready to adopt new ideas their grandparents would have scorned.

Italian and Spanish cooks started the process by incorporating the new ingredients into quick and easy baked goods using methods known since antiquity. The basic formula couldn’t be simpler. First whip some egg whites with sugar to make a meringue, using a more generous amount of sugar than before since it was now more affordable. Fold in some imported almond paste, and then bake. And there you have it! The first macaroons, commonly known as “Marzipanetti in Italy.

Matters evolved from there, with bakers slowly adopting the regional variations that eventually hardened into recipes. We have now worked up four versions of that basic recipe, distinguished by relatively small changes in the way they’re flavored and presented. Here is a table to more-or-less compare the four recipes, normalized to an even one pound of almonds. [NOTE: The different egg sizes occur because those recipes start from a different amount of almonds].

Most Ancient Macaroons

* 450 g almond meal

* 300 g sugar

* 3 XL egg whites

* No zest

* ½-1 tsp. almond extract

* 350° for ≈ 10 minutes
Ricciarelli


* 450 g almond meal

* 300 g sugar or 150 g honey
* 2 egg whites + 1 yolk
* Orange zest

* 2 tsp. almond & vanilla

* 350° for ≈ 12-13 minutes
Alemandrados


* 450 g almond meal

* 265 g sugar

* 1 jumbo egg

* Lemon zest

* ½ tsp. almond extract

* 350° for 8-10 minutes
Amaretti


* 450 g almond meal

* 290 g sugar

* 4 egg whites

* No zest

* 9 tsp. almond extract

* 350° for ≈ 12 minutes
See also the Walnut Macaroon Orehovki

Not a lot of differences, are there?

  • The Most Ancient Macaroon included a hefty amount of sugar and some bitter almonds. We were forced to substitute almond extract for the latter. Bitter almond extract would be even better if you can find it. This cookie is super simple, focused on those new imports, and consistent with the oldest macaroon recipes we could find after a week or two of search. NOTE: Scott believes it may be even more authentic to replace the sugar and almonds with premade almond paste, because that product would have been easier to ship back in the day.
  • Italian Ricciarelli, a specialty of Siena, must have orange zest but vary from there. We reviewed more than a dozen variations before settling on a version that includes an elusive hint of vanilla, some honey to enhance the sugar, and a single egg yolk to give them some richer chew. The cookies would still be Ricciarelli without those additions, but they help to distinguish this cookie from its macaroon peers. And they’re good. We also adopted the trick of adding some baking soda into the dough, because it creates attractive cracks in the powdered sugar crust.
  • Spanish Almendrados add lemon zest instead of orange, use whole eggs, and ignore the initial meringue step. Throw it all in a food processor and go! This methodology, combined with the shorter baking time, gives the cookie a fabulous chew you’ll particularly enjoy. They come with a classic almond-on-top decoration, and a granulated sugar crust.
  • You can find Amaretti in our cookbook, Heritage Cookies of the Old and New World. The recipe looks very similar to the Most Ancient Macaroon except for a monstrous hit of almond extract, and the candied cherry on top. Our reference to “Rudolph’s Nose Cookies” wouldn’t have made much sense in 15th century Italy. Neither would reindeer if you think about it.

Continue your travels around the Mediterranean and you’ll see extremely similar cookies such as those flavored with rose water (a favorite in Turkey), or with walnuts and walnut extract in place of almonds. Move north and things begin to differ more, with roll-and-cut meringues such as Basler Brunsli (mix of almonds and hazelnuts, cocoa powder, and cherry liqueur) or German Zimtsterne (mix of almonds and hazelnuts, cinnamon, other spices, and lemon icing).

But here’s the bottom line. Macaroons go so deep into the roots of modern Europe that there’s really nothing older except the extant waybread recipes. They’re also simple to make and easy to modify into infinite variations. It’s an invitation to play, and we encourage all you creative people to do so!

Here are our recipes for all four, plus a bonus recipe from the Balkans: a terrific macaroon based on walnuts instead of almonds.

Enjoy!

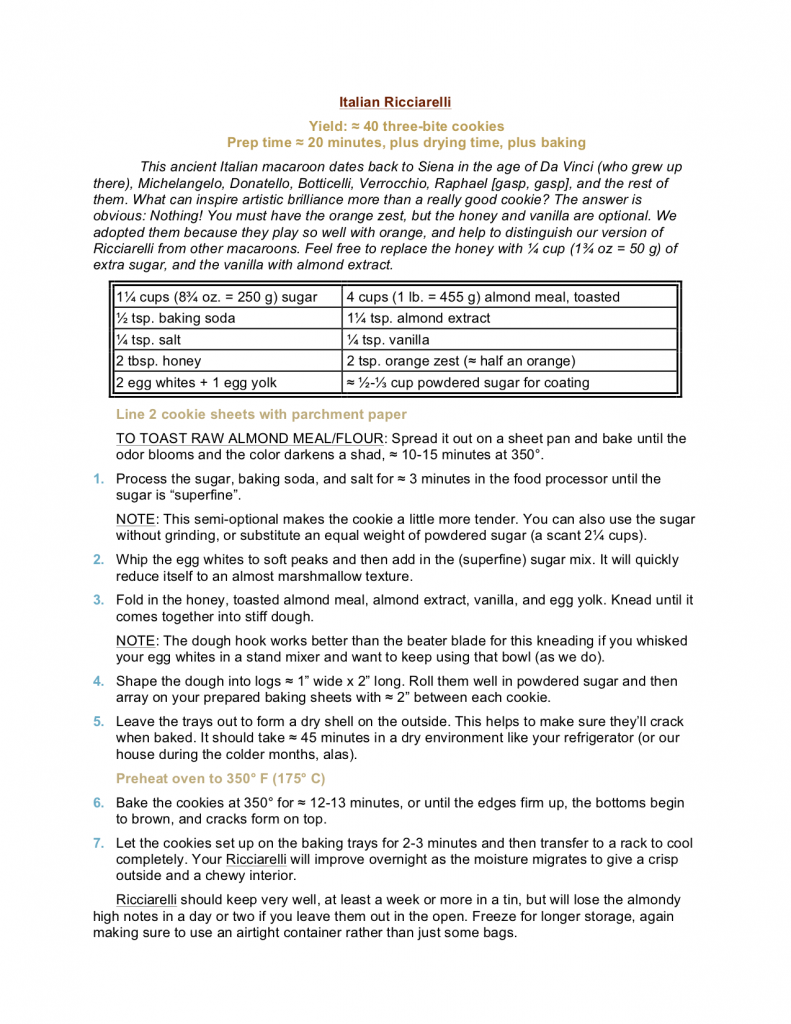
Ricciarelli, the ancient macaroon of Sienna, Italy that Leonardo and the rest grew up on
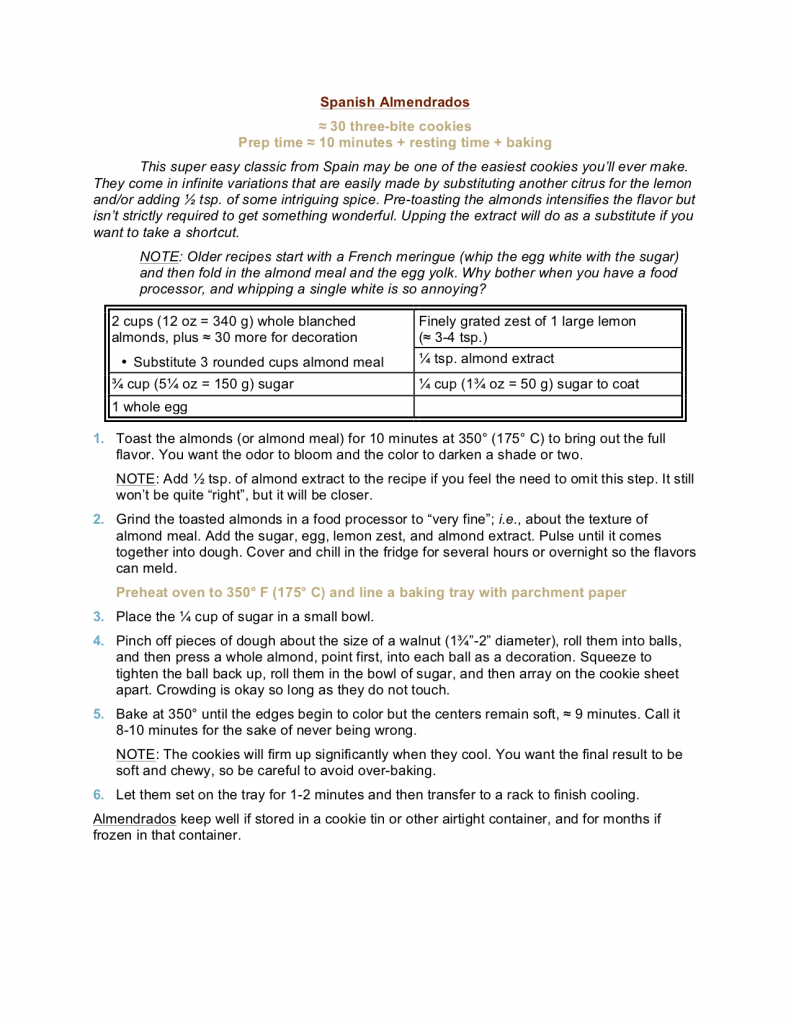
Spanish Alemandrados
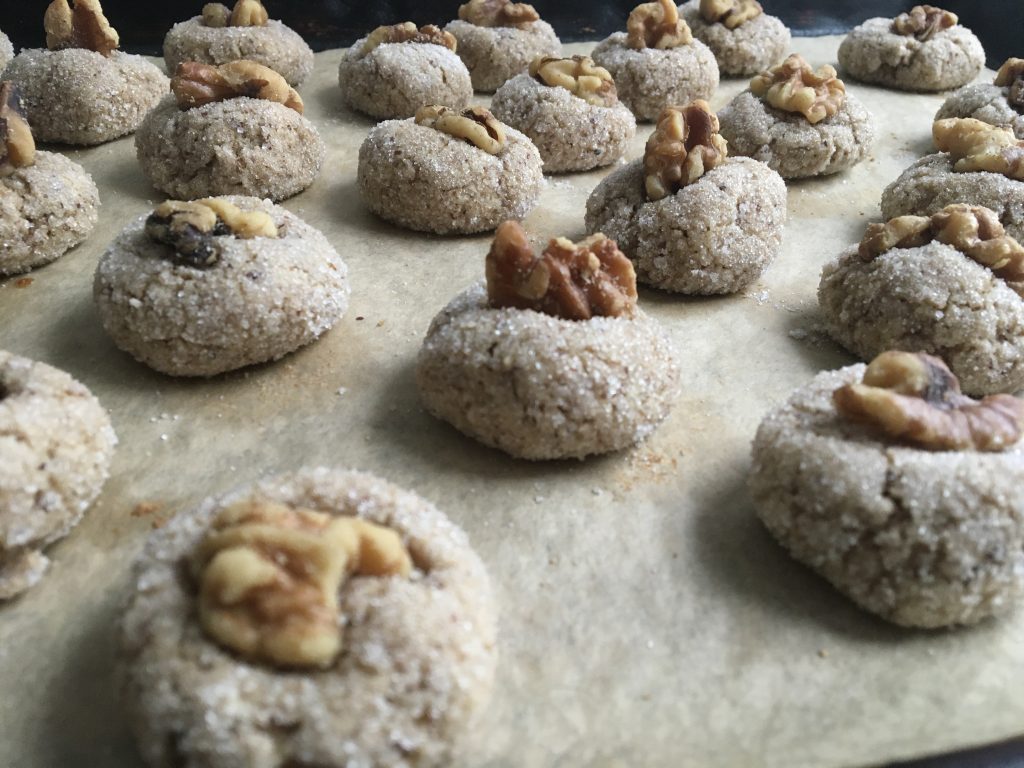
Orehovki, a/k/a Walnut Amaretti from the Balkans

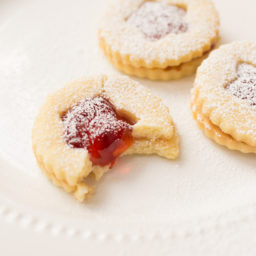
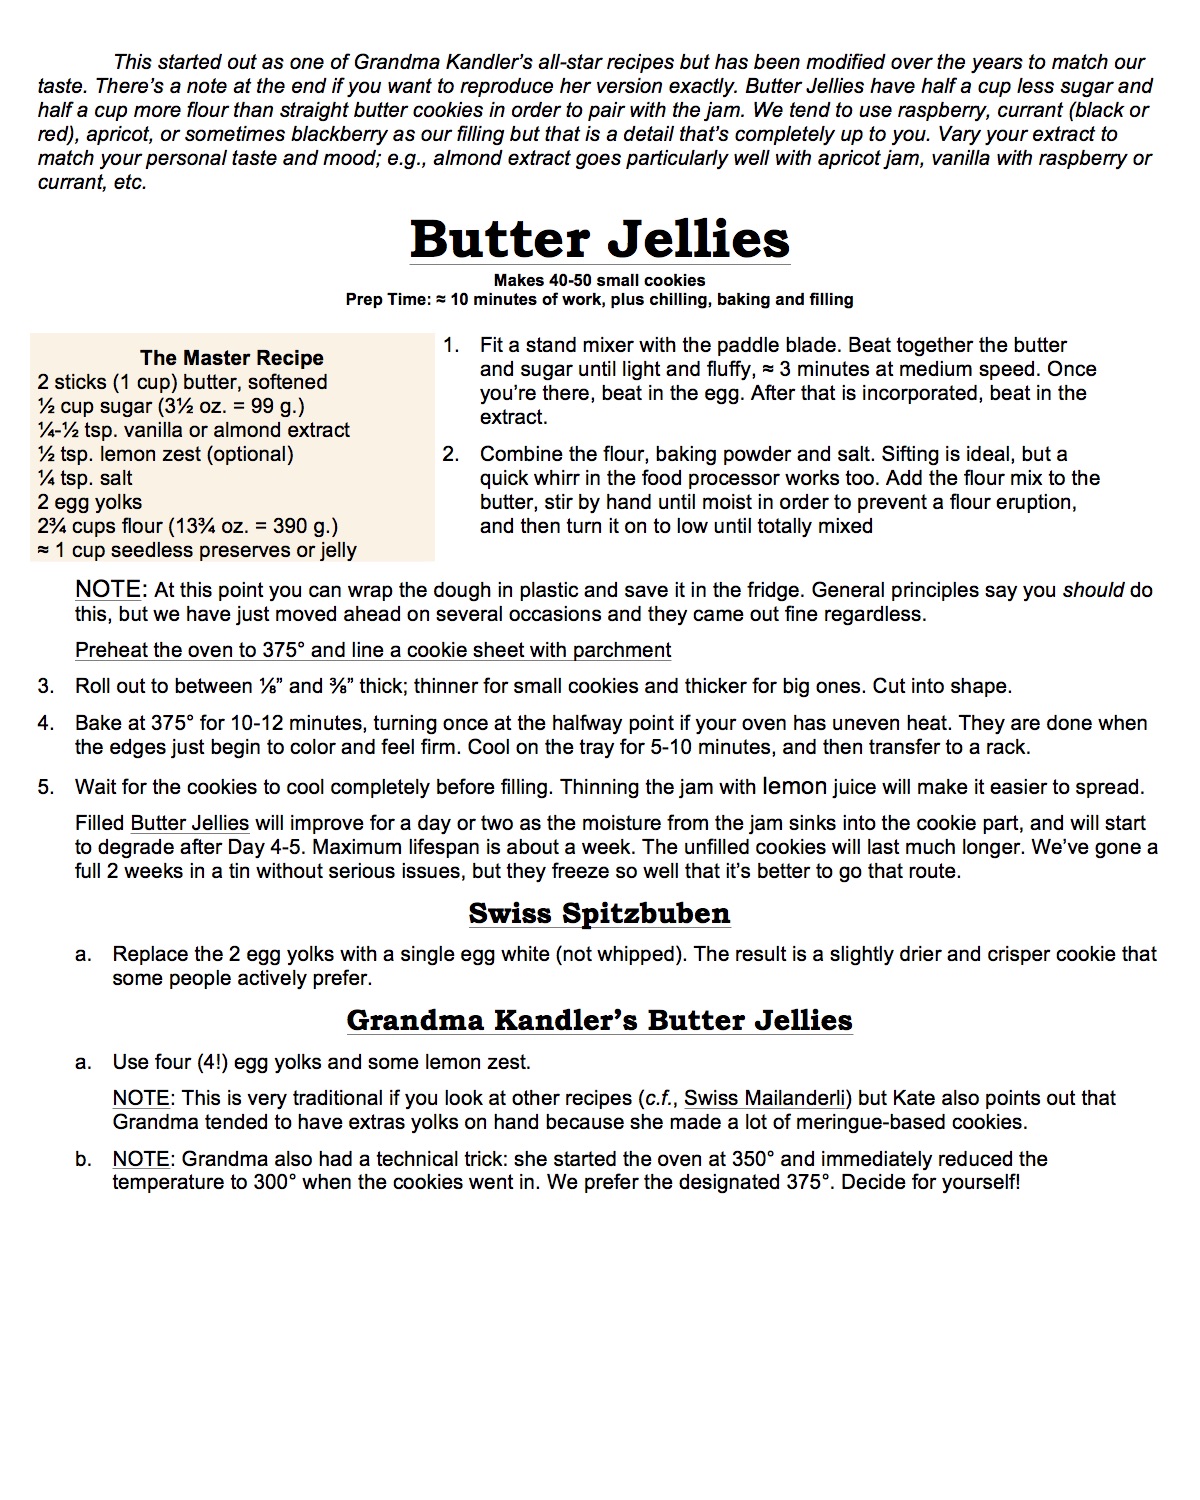
BUTTER JELLIES, SPITZBUBEN, & MAILANDERLI – The one that everyone loves

When you make as many high quality cookies as we do, you get used to a couple of standard questions. The top two have to be, “What are your favorite cookies?” and “What is the favorite cookie overall?” The answer always disappoints: there are no real, statistical favorites because individual tastes end up dominating. But one thing we can say for sure is this:

People adore filled cookies.

There’s just something very “extra” about treats inside a treat. And that’s extra “extra” for Butter Jellies, because the jam in the middle (a) makes them spectacularly pretty, and (b) adds a series of bright berry flavors that cannot be baked into a dough. Yes, you can now find freeze dried berries in a lot of supermarkets. And yes, they add a bit of true berry flavor into your dough that people can taste even through all the butter and other ingredients. But it isn’t the same because the full berry flavor includes a lot of things that don’t come through, such as all the bright high notes.

Those require either an icing or, as in this case, a filling. The combination of tart/sweet jam and buttery cookie is irresistible. If these aren’t the #1 favorite on our annual tray, they probably count in the top three for a vast majority.

It’s really a simple cookie. Butter Jellies and their variations are a basic, roll-and-cut, shortbread/butter cookie with just enough flour to hold together for a few days after they’re sandwiched around liquidy jam. The variations are subtle, and amount to either more egg yolks (Grandma Kandler’s version, which is known in Switzerland as star shaped Mailanderli), or the use of egg whites instead of yolks for a drier mouthfeel (Swiss Spitzbuben). What about whole eggs? We tested it of course, and they work fine from the sturdiness point of view, but we ended up preferring either the rich chew of yolks alone or the dry counterpoint from using only whites. Your mileage may vary.

The jam is up to you. We used to adore rose hip jam, but it became unavailable 5-10 years ago. Nowadays it’s currant jam or blackberry because we reserve raspberry for Linzer Tarts.

And no! These are not Linzer Tarts! That is a name that comes from a classic, pie-sized Austrian Torte made from a fragrant hazelnut/lemon piecrust. No nuts, no Linzer. Thus Sayeth The Lord! So do not blaspheme. These are Butter Jellies.

Make Linzers too. That’s our solution, and if it’s good enough for our family, it’s good enough for yours!

BONUS FREEBIE! To convert Grandma’s version into true Mailanderli:

  1. Use 3-4 yolks in the dough.
  2. Increase the amount of lemon zest to a full 1-1/2 tsp.
  3. Increase the amount of vanilla to a full 1-1/2 tsp.
  4. Cut the dough into stars
  5. Coat the top before baking with an egg wash made from 1 whole egg thinned with a bit of water.

You can follow Grandma’s cooking technique but we’ve had equal success with a constant 325.° Either way, they will want to cook longer because of the lower temperature. 20-25 minutes should be about right.